Tedee Keypad PRO
User guide and installation manual
Contents
- Introduction
- Key features
- Device elements
- Smart lock compatibility
- Device placement
- Tedee Bridge
- Security
- Device
- Access sharing
- PIN access
- Fingerprint access
- Installation Considerations
- Power supply
- 4 x LR03 AAA 1.5V batteries
- 5-24V DC, 0.5A wired input
- Wall mount
- Power supply
- Installation Methods
- Battery-powered device
- INSTALLATION A: with an adhesive pad
- INSTALLATION B: with bolts and screws
- Wired-powered device
- INSTALLATION C: with an adhesive pad
- INSTALLATION D: with bolts and screws
- Power connection
- Battery-powered device
- Activation
- Access Management
- PIN management
- Fingerprint management
- Adding a new fingerprint
- Smart Lock Control
- Unlocking
- Using a fingerprint
- Using a PIN
- Manual locking
- Using a PIN
- Unlocking
- Maintenance
- User management
- Settings
- Battery replacement
- Factory reset
Introduction
The Tedee Keypad PRO is a smart biometric keypad that wirelessly connects to a paired Tedee PRO or Tedee GO smart lock. It enables keyless unlocking of a Tedee smart lock using authorized PINs or fingerprint scans.
IMPORTANT: Before using your new Keypad PRO, please read the accompanying safety information booklet carefully, as your safety is our top priority. It contains important information that will help you use your Keypad as smoothly and safely as possible.
Key features
- Unlocks a smart lock with up to 100 individual PINs, each with customizable authorization in the Tedee app and Tedee Portal.
- Unlocks a smart lock with up to 100 individual fingerprint scans, with authorization scope managed in the Tedee app.
- On-demand smart lock locking – with or without PIN authorization.
- Self-check-in automation for short-term rental applications using integrated channel management platforms.
Note: Unlike the Tedee Keypad, the Tedee Keypad PRO does not offer bell button notifications.
Device elements
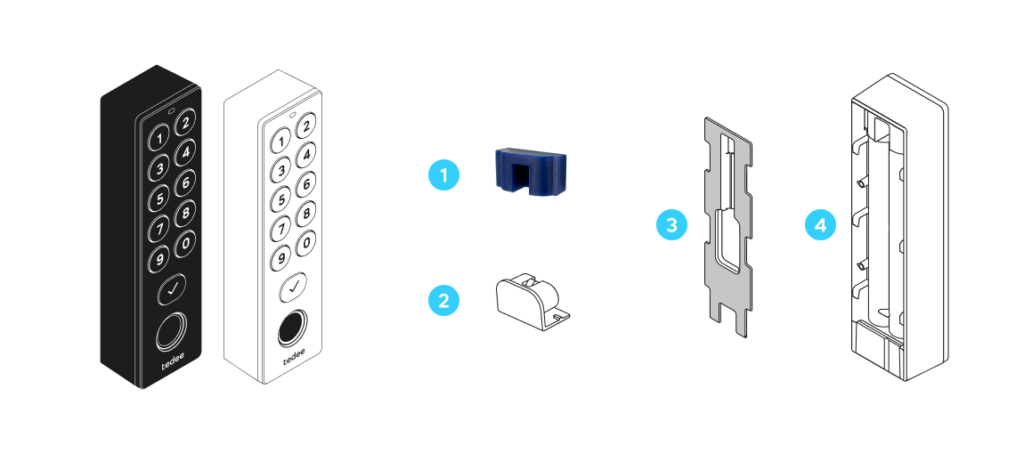
The Tedee Keypad PRO consists of four elements:
- Seal
- Battery cover
- Mounting plate
- Body
The device is equipped with:
- Numeric and confirmation buttons
- Fingerprint scanner
- LED signal indicator
- Sound signal
- Internal port for wired power input
Smart lock compatibility
The Tedee Keypad PRO works exclusively with Tedee PRO and Tedee GO smart locks.
Each Tedee Keypad PRO device can be used with only one Tedee PRO or Tedee GO smart lock at a time.
Device placement
Since the Tedee PRO or Tedee GO smart lock is installed inside the property, the Tedee Keypad PRO should be installed outside the door, enabling keyless unlocking. It is rain-resistant and safe for outdoor installation.
The Tedee Keypad PRO connects to the Tedee PRO or Tedee GO smart lock via Bluetooth, with a maximum range of up to 10 meters (approximately 30 feet). However, this range may be affected by the door leaf or building structure. For optimal performance, it is recommended to install the Tedee Keypad PRO as close to the door as possible.
Tedee Bridge
The Tedee Bridge is not required to operate the Tedee Keypad PRO with your smart lock.
However, pairing the Keypad PRO with a Wi-Fi-connected Tedee Bridge enables automatic firmware updates.
You can pair the Tedee Keypad PRO with the Tedee Bridge from the Bridge device screen once both devices are added to your Tedee account.
Security
Device
Aside from the mounting plate, the device is not permanently attached to the wall and can be removed without tools.
Tedee Keypad PRO does not store PINs locally, so they cannot be retrieved from the device. When creating new fingerprint-based permissions, the fingerprint data is tokenized, meaning it is converted into non-sensitive unique data that cannot be retrieved or used elsewhere.
If stolen, the device cannot be added to another account or used with a different Tedee smart lock until it is removed from the Administrator account in the Tedee app.
Unauthorized access attempts will not allow entry and will be logged in the smart lock’s activity logs.
Access sharing
PINs and fingerprints are separate authorizations, independent from the Tedee app’s email-based accounts. Each PIN and fingerprints must have a unique name for activity tracking in the Tedee app or Portal.
By default, each access method provides permanent access through the Tedee Keypad PRO.
Each PIN and fingerprint scan can have customized access permissions on select:
- Dates, e.g., Dec 1-31, 2024
- Days of the week, e.g., Thursdays only
- Hours, e.g., 7:30-18:00
Permissions with mixed settings can allow access, for example, only on weekends in 2025 from 10:00 to 20:00.
Persons attempting to unlock the door using a PIN or fingerprint outside of their access permissions will not be able to unlock the smart lock. Their activity is logged in the activity history as unauthorized.
PIN access
The Tedee Keypad PRO supports PINs between 5-8 digits.
Sequential or repeated number combinations are not allowed.
Fingerprint access
The Tedee Keypad PRO and the Tedee system do not store users’ sensitive biometric information.
Each fingerprint must be registered in person by tapping multiple times on the fingerprint scanner. Remote registration or sharing of fingerprints across multiple Tedee Keypad PRO devices is not available.
The Tedee Keypad PRO can register scans of any finger (e.g., thumb, index finger, etc.). Each finger’s scan is considered a separate entity, even if one person has multiple fingerprints authorized for access.
Installation considerations
The final installation process is determined by your choice of power supply and wall mount method, which can be mixed and matched according to your preferences.
Please read the installation instructions for your chosen power supply and wall mount combination thoroughly before proceeding.
- Adhesive pad + batteries: INSTALLATION A
- Bolts and screws + batteries: INSTALLATION B
- Adhesive pad + wired input: INSTALLATION C + Power connection
- Bolts and screws + wired input: INSTALLATION D + Power connection
Power supply
The Tedee Keypad PRO can be powered by two methods:
4 x LR03 AAA 1.5V batteries
A single set of batteries powers the Tedee Keypad PRO for 12+ months. When the battery level drops to 15%, the Tedee app notifies the user to replace the batteries.
If the batteries are fully discharged, the Tedee Keypad PRO will deactivate itself, but the Tedee smart lock can still be unlocked using other smart methods, such as the Tedee app or smartwatch.
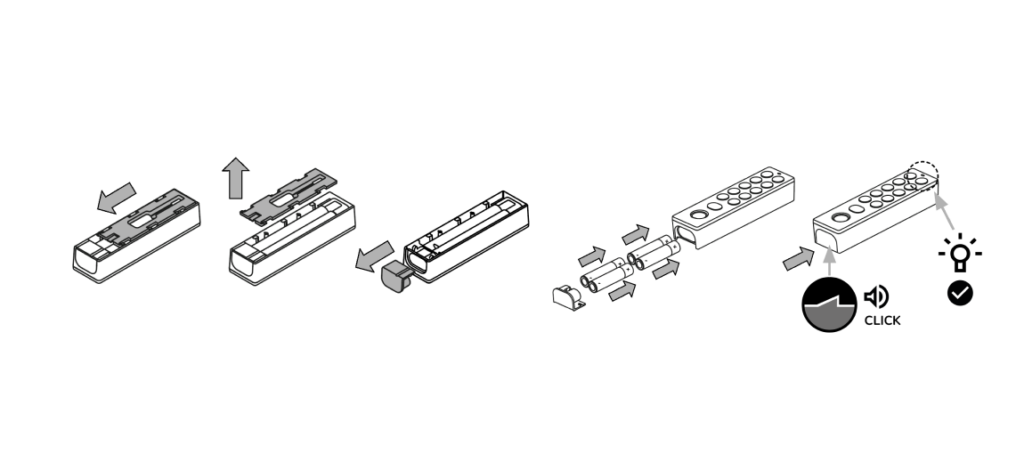
To install batteries in the Tedee Keypad PRO:
1. Slide down and lift the mounting plate on the back of the device.
2. Remove the battery plug from the device base.
3. Insert 4 x AAA batteries, ensuring the correct “+” and “-” orientation, as shown in the illustration or engraved guides.
4. Reinsert the battery plug into the device until you hear a click, confirming a secure fit.
5. The device will turn on automatically, indicated by a LED light blinking red, blue, green, and white.
5-24V DC, 0.5A wired input
The Tedee Keypad PRO can be connected to a permanent power supply, eliminating the need for battery maintenance.
It is recommended to use a wired connection with batteries installed in the device as a backup in case of power outages.
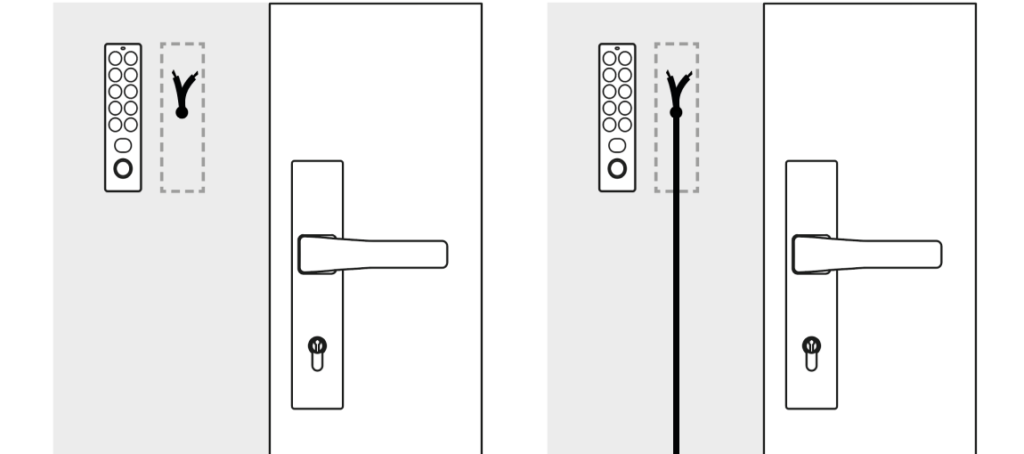
The power wire can be connected to the Tedee Keypad PRO in either in-wall or on-wall surface installations.
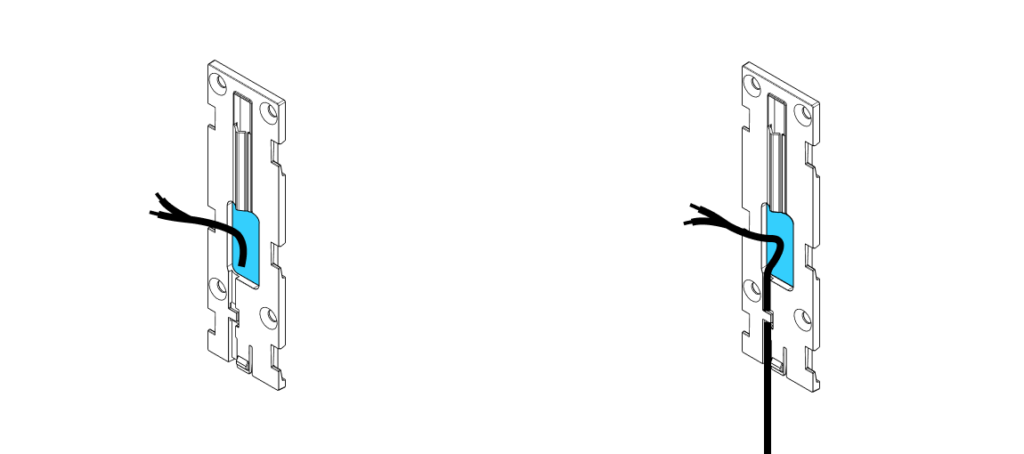
Proper mounting plate placement is essential for a wired device. Ensure the wire input aligns with the wide opening in the mounting plate at the desired position.
If connecting a wall-surface-mounted wired input, make sure the cable can be positioned inside the mounting plate’s cable slot.
Wall mount
The installation method for the Tedee Keypad PRO can be adjusted to fit the type of surface. Ensure you consider your power supply method before proceeding with wall mount installation.
Please note that the Tedee Keypad PRO is not permanently attached to the wall, and the device body can be relatively easily slid off the mounting plate without tools.
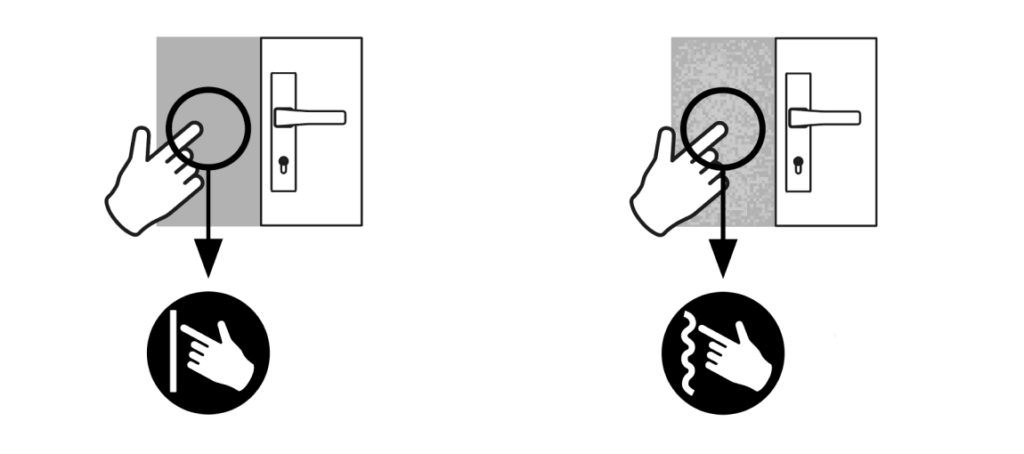
| Smooth surface
Recommended installation with an adhesive pad. |
Coarse or porous surface
Recommended installation with bolts and screws. |
Installation methods
Battery-powered device
If you decide to power the Tedee Keypad PRO with batteries only, follow the instructions for your chosen wall mount method.
INSTALLATION A with an adhesive pad
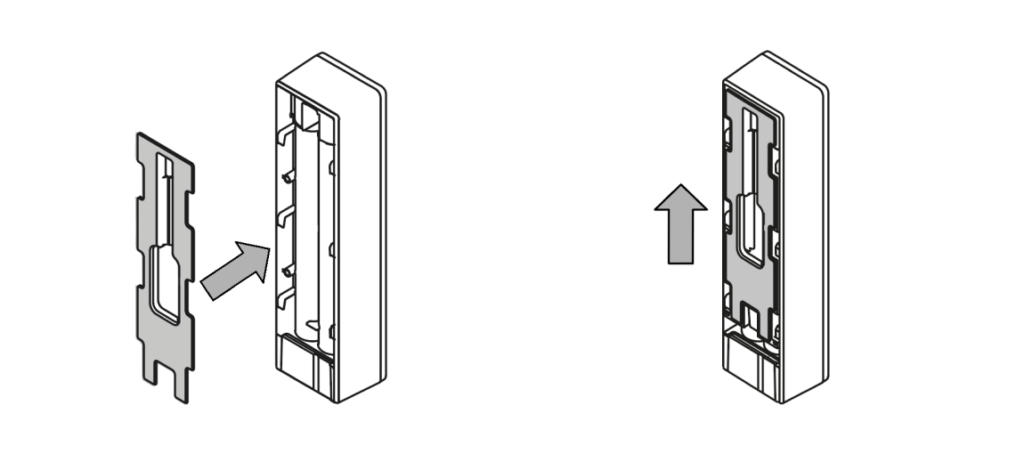
With the batteries installed in your device, slide the mounting plate back onto the device body.
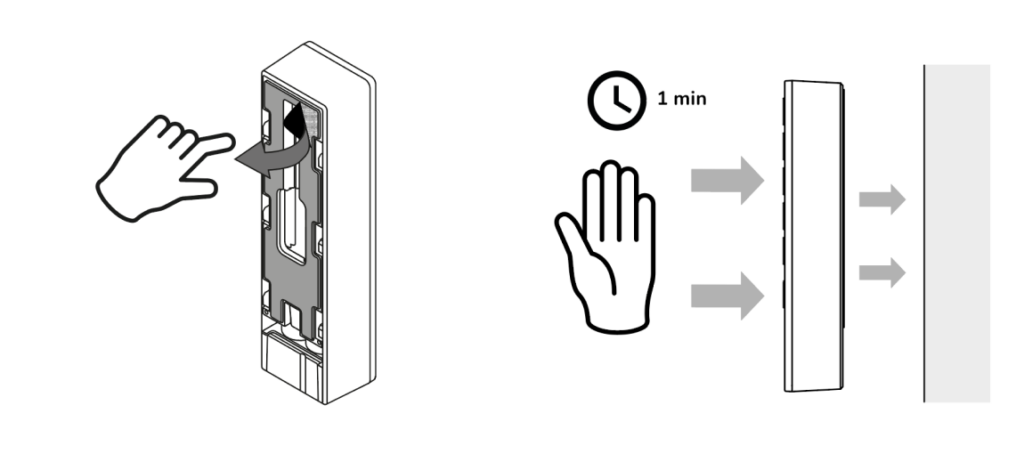
Remove the protective layer from the adhesive pad on the mounting plate, then press the device to the wall at your desired location. Hold for 1 minute to ensure a secure hold.
Proceed to activate the device in the Tedee app.
INSTALLATION B with bolts and screws
Position the mounting plate at the desired spot on the wall and mark four holes with a pencil.
Drill four holes at the marked locations.
Insert four bolts from the device box into the drilled holes.
Place the mounting plate over the bolts and secure it with four screws from the device box.
Slide the Tedee Keypad PRO body onto the wall-mounted plate.
Proceed to activate the device in the Tedee app.
Wire-powered device
When installing a wire-powered device, mounting plate placement is crucial. Ensure the wire input aligns with the wide opening in the mounting plate at the desired position.
If connecting a surface-mounted wired input, ensure the cable is positioned inside the mounting plate’s cable slot.
|
WARNING NEVER plug the device directly into an electrical outlet or a 230V/110V power supply. There is a high risk of electrocution, fire, and physical injury if ignored. DO NOT touch the outputs of your installation without proper insulation (e.g., rubber gloves). Even when the device is off, the outputs may still be live (actively transmitting electricity). ALWAYS perform installation work with the power circuit disconnected. |
INSTALLATION C with an adhesive pad
Measure the mounting plate against the wall to ensure the electrical cable reaches the central hole in the plate and fits the cable slot, especially with surface-mounted cables.
Mark six indentations for the mounting plate on the wall with a pencil.
Remove the protective layer from the adhesive pad, then press it to the wall, aligning with the marked indentations and cable position. Hold for 1 minute to ensure a secure mount.
Proceed to the power connection.
INSTALLATION D with bolts and screws
Measure the mounting plate against the wall, ensuring the electrical cable reaches the hole in the centre of the plate and fits the cable slot.
Mark four holes on the wall with a pencil.
Ensure the power circuit is disconnected!
Drill four holes at the marked spots, taking care not to damage the electrical wire.
Insert four bolts from the device box into the drilled holes.
Place the mounting plate over the bolts, ensuring proper cable placement, and secure it with four screws.
Proceed to the power connection.
Power connection
Remove the seal from the Tedee Keypad PRO body to reveal the power port.
Thread the power adapter cable included with the Tedee Keypad PRO through the seal. Ensure the cable end with the port is behind the flat part of the seal.
Connect the power adapter cable to the wall’s wired output. Ensure proper insulation against both electricity and moisture.
- Connect the positive wire (+) to the red Tedee Keypad PRO wire.
- Connect the negative wire (-) to the black Tedee Keypad PRO wire.
Plug the power connector into the port in the Tedee Keypad PRO.
Push the seal back into the device body with the cable threaded through, securing it in the slot at the top of the mounting plate.
Slide the device onto the mounting plate, carefully positioning any excess cable under the body.
Slide the device down to lock it onto the mounting plate.
Turn the power circuit back on to activate the device, as indicated by a blinking LED.
Proceed to activate the device in the Tedee app.
Activation
Before activating your Tedee Keypad PRO, ensure that the Tedee PRO or Tedee GO smart lock you intend to use is already added to your Tedee account with owner authorization.
Note: if your devices are added to an “Organization” (via the portal.tedee.com feature), the keypad must also be added to the same “Organization” during the inclusion process.
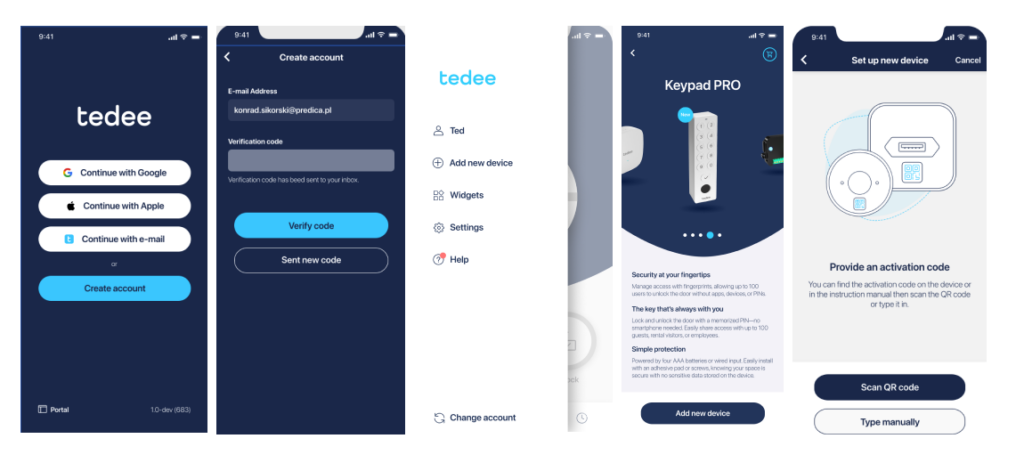
Launch the Tedee app on your smartphone.
Log in with the account that has owner authorization for the smart lock you want to pair with your new Tedee Keypad PRO.
Tap the menu icon in the top-left corner of the screen and select “Add new device.”
Scroll to the “Keypad PRO” device and confirm.
You will be asked to provide an activation code.
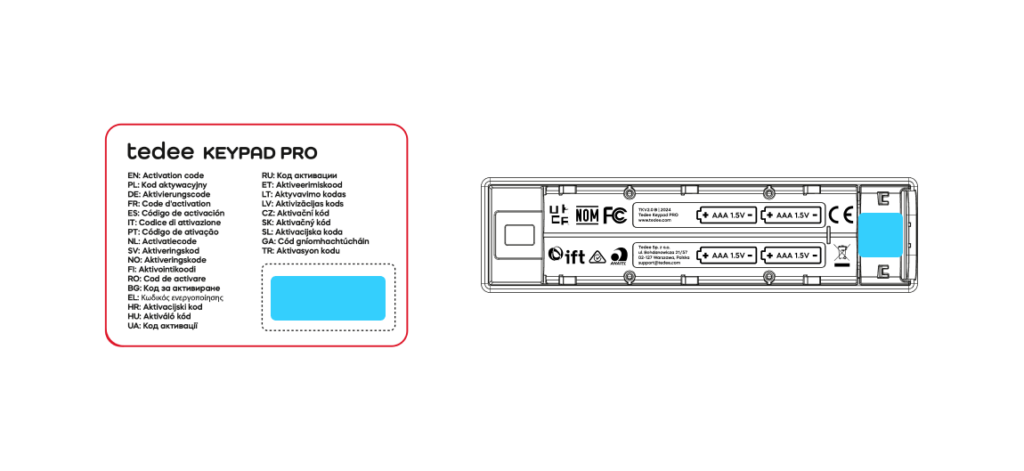
The activation code for your Tedee Keypad PRO is supplied on the activation code card in the box or as a sticker on the device body, underneath the mounting plate.
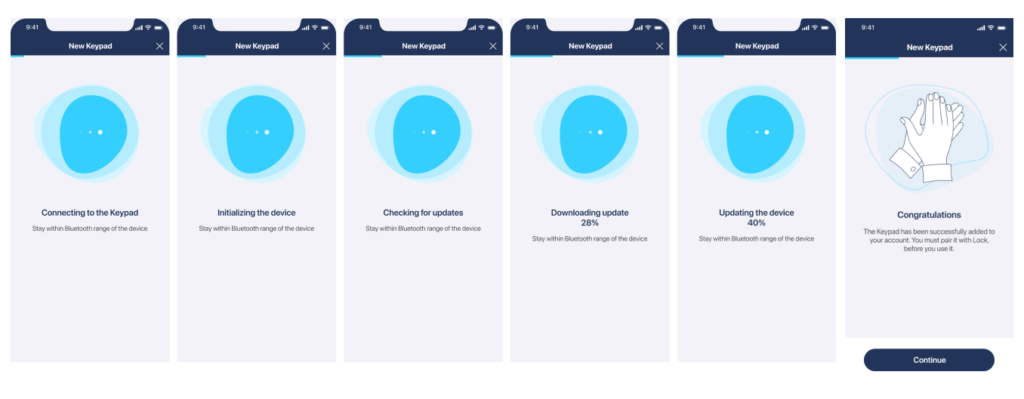
Scan the code with your smartphone camera or enter it manually using your keyboard.
The app will connect to the device, check for, and download its firmware update. After a moment, the device will be paired with your account.
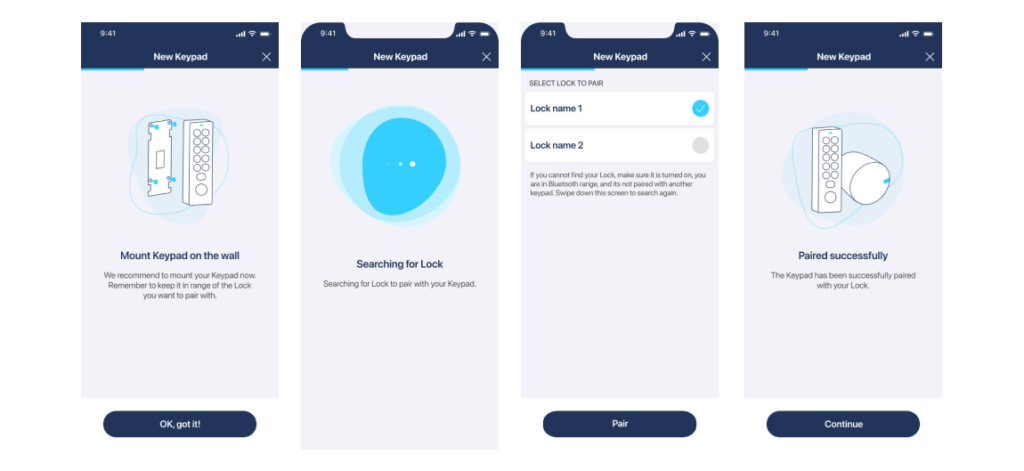
Now, you need to pair your Tedee Keypad PRO with your smart lock.
Ensure your Keypad PRO is installed on its mounting plate, at the location you want it to be. Confirm, and the app will scan for smart locks within Bluetooth range.
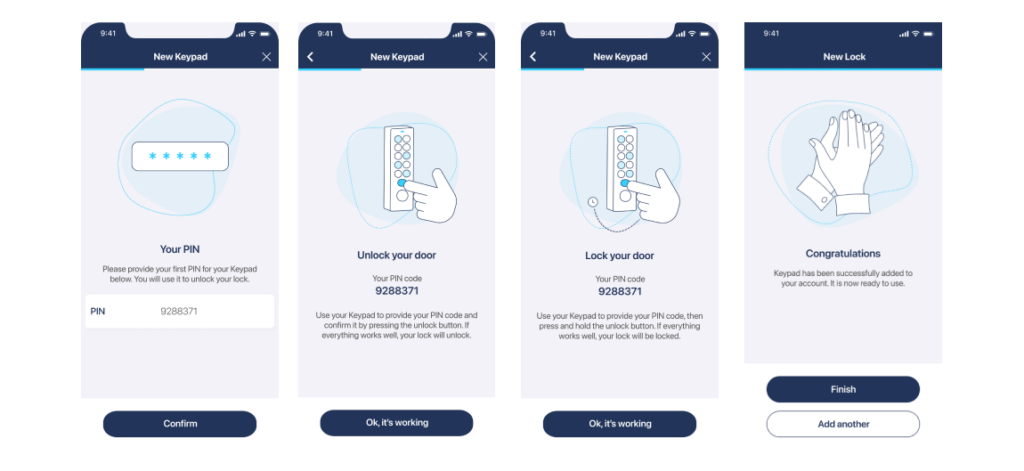
The app will guide you through generating your first access PIN.
The app will suggest a new, automatically generated secure PIN, which you can edit according to your security requirements.
After confirming, the app will ask you to use the PIN on the keypad to unlock and lock the paired smart lock.
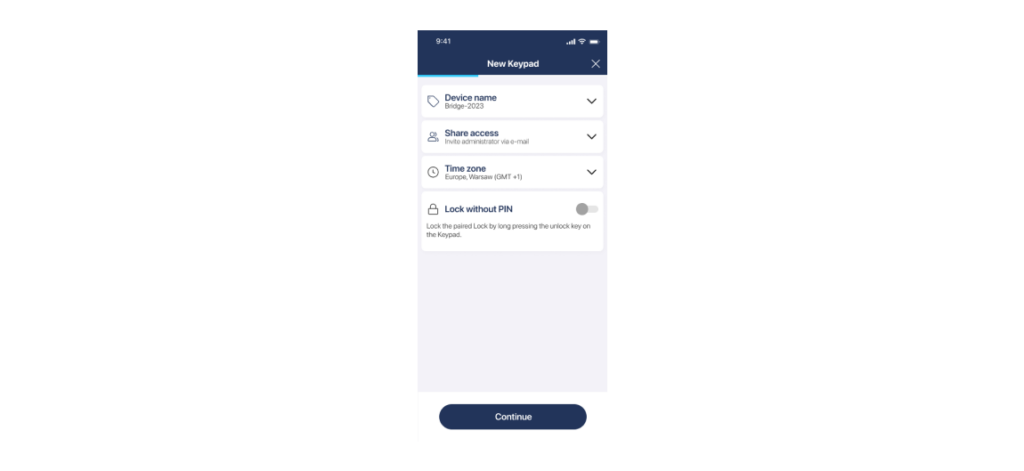
At the final stage, you can complete the device settings: set its name, operating time zone, share administrative access with other users, or enable PIN-less manual locking.
Proceed to the next step to add fingerprint access.
Access management
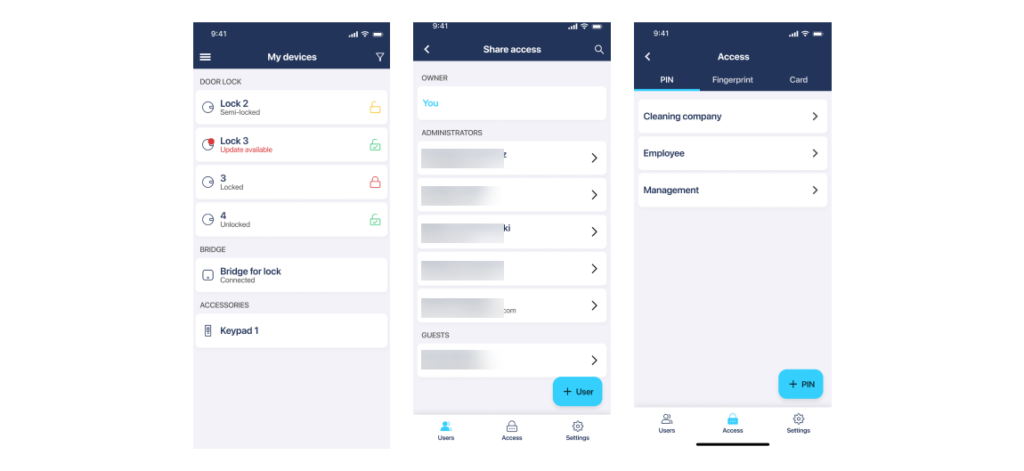
To manage access with your Tedee Keypad PRO, select it from the list of your devices.
Tap the Access tab at the bottom of the menu.
PIN management
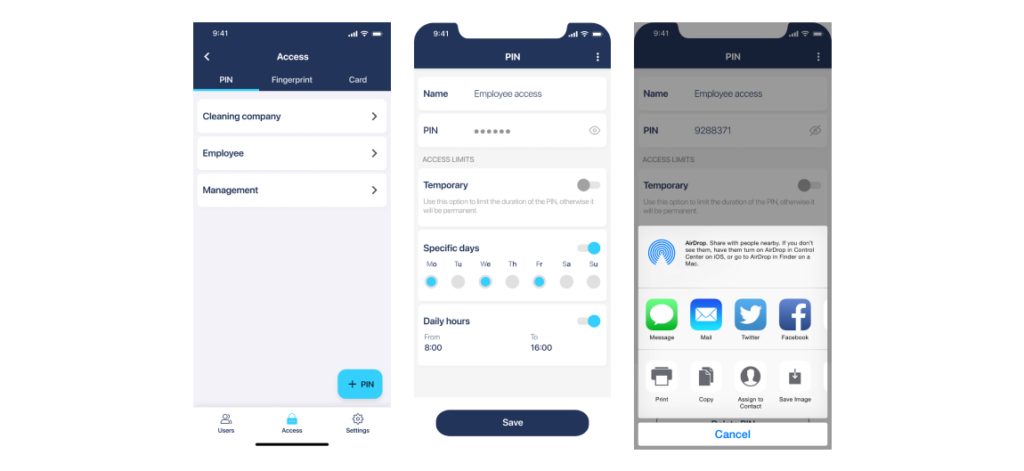
In the default “PIN” tab of the Access screen, you’ll see a list of all active PINs for this device.
Select an existing PIN to edit its access permissions, or tap the “+” icon in the lower-right corner to create a new one.
You can edit the code, adjust access permissions, or delete each active PIN.
After saving the PIN, you may access its sharing features by pressing the three dots icon in the top right corner of your screen. Remember to share PINs only through secure communication methods.
Fingerprint management
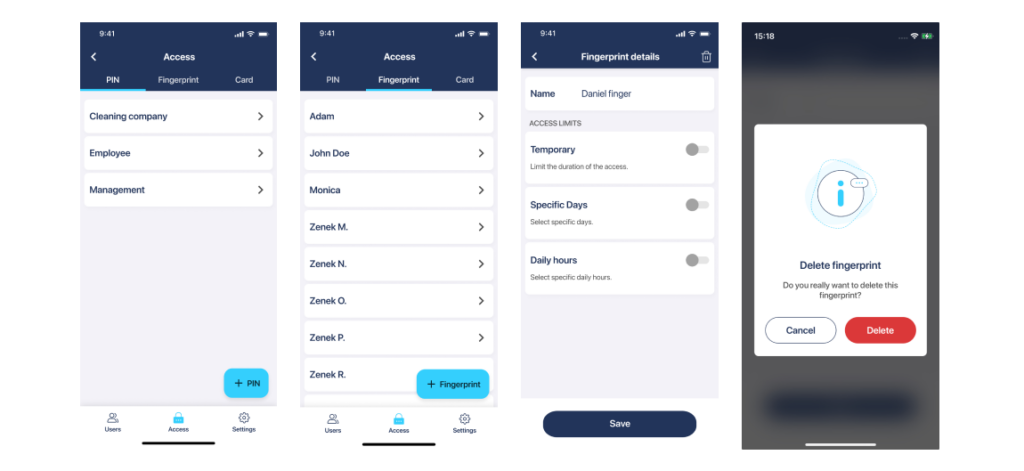
In order to manage fingerprint access – add new fingerprints or manage existing fingerprint permissions – your smartphone must be connected with the Tedee Keypad PRO via Bluetooth.
Select the “Fingerprint” tab to view all active fingerprints for this smart lock.
You can edit the access permissions of each fingerprint or delete it using the trash bin icon.
Adding a new fingerprint
In order to add a new fingerprint, your smartphone must be connected with the Tedee Keypad PRO via Bluetooth.
Tap the “+” icon in the fingerprint list.
Ensure the finger used for scanning is clean and dry. If excess moisture is detected on the skin, the device will display an error message.
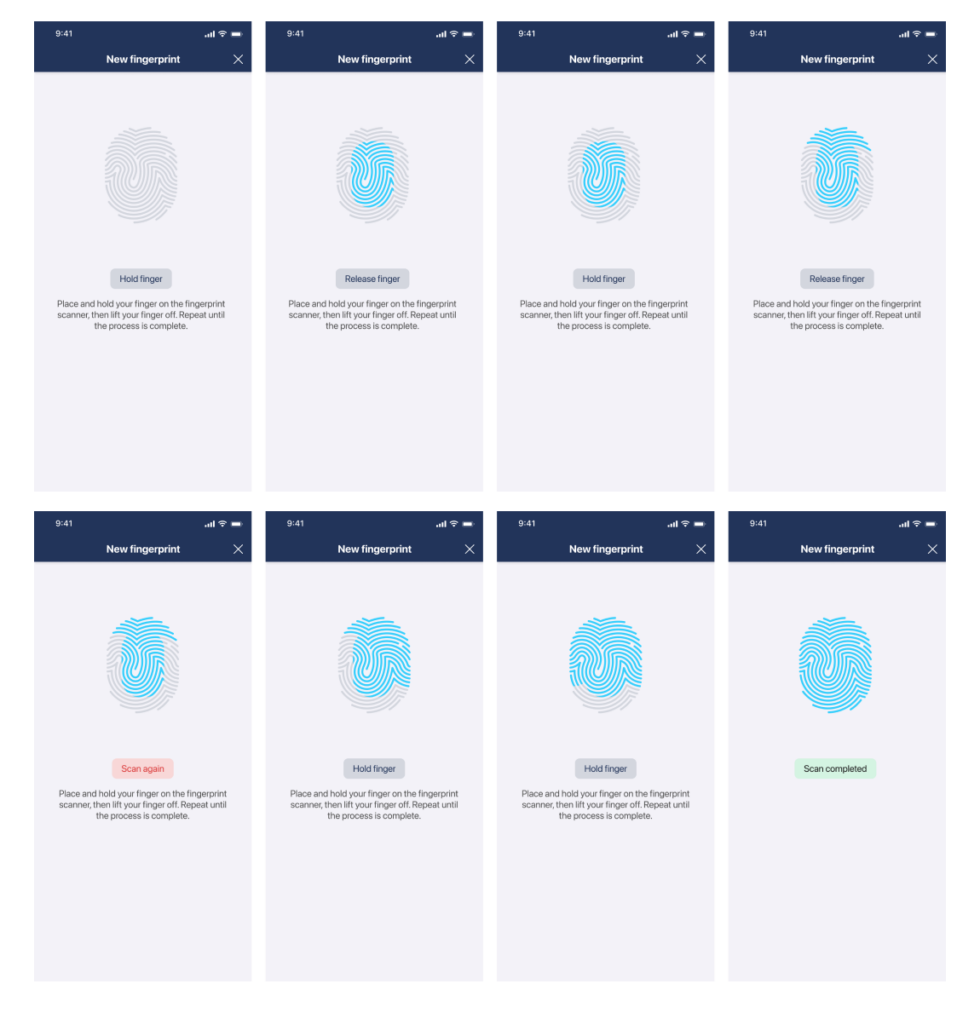
Follow the on-screen prompts, which will guide you to repeatedly place and lift your finger on the scanner until the scan is complete.
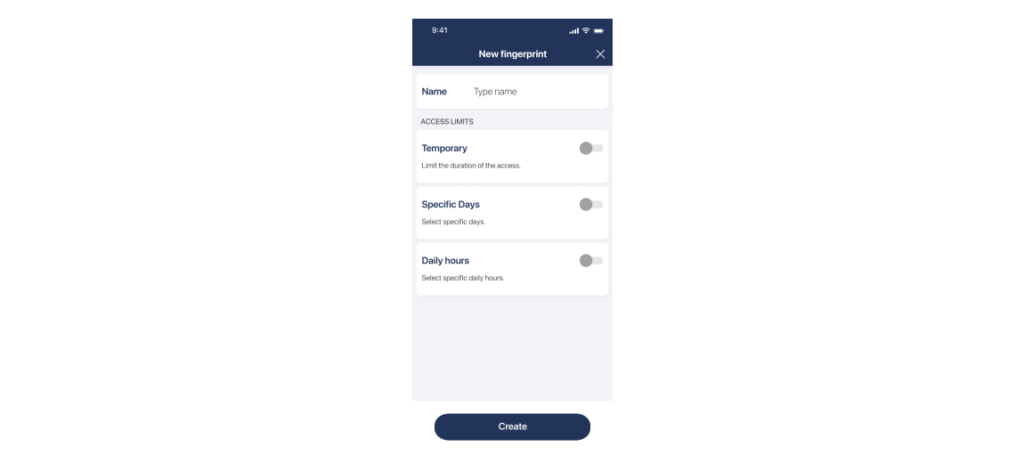
After scanning, enter a name for the fingerprint and set its access permissions.
Smart Lock Control
Unlocking
The main purpose of Tedee Keypad PRO is the wireless control of a connected Tedee GO or Tedee PRO smart lock by users with authorized PINs or fingerprints.
Using a fingerprint
To unlock a smart lock using a fingerprint, place your fingertip on the round black fingerprint scanner located on the Tedee Keypad PRO.
The device provides feedback using sound signals and LED lights: a green light confirms success, while a red light signals an error.
Using a PIN
To unlock a smart lock with a PIN, input the code using the numeric buttons and confirm with the ✓ button.
The device provides feedback using sound signals and LED lights: a green light confirms success, while a red light signals an error.
If you make a mistake while entering your code, press the ✓ button immediately. The device will respond with a sound signal and red light, as if you entered an incorrect PIN. Then, re-enter your PIN.
Manual locking from the outside
Tedee Keypad PRO enables manual locking of the connected Tedee smart lock from outside your property, even without using the smartphone app.
By default, the Tedee Keypad PRO requires an authorized PIN to lock the door. To manually trigger the locking of the smart lock, input your PIN on the Tedee Keypad PRO and press and hold the ✓ button.
Without a PIN
If you prefer to enable manual locking of Tedee GO or Tedee PRO without entering a PIN, activate the “Lock without PIN” feature in the settings panel of your Tedee Keypad PRO.
Maintenance
User management
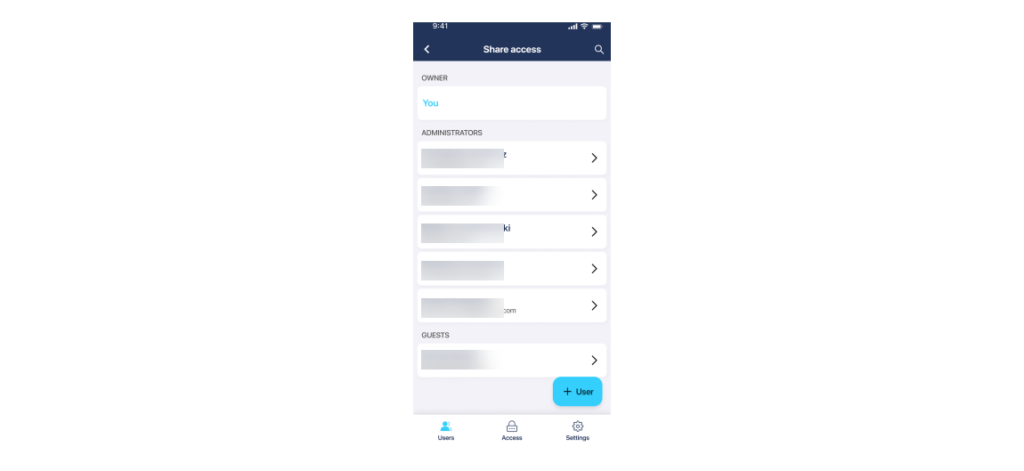
The Users tab of the Tedee Keypad PRO device screen allows you to share device management with others.
Note: Sharing control over the Tedee Keypad PRO with other users is separate from sharing access to a smart lock.
The Keypad Administrator can add, edit, and remove fingerprint credentials, as well as access the device settings.
There is no Guest user role for the Tedee Keypad PRO.
Settings
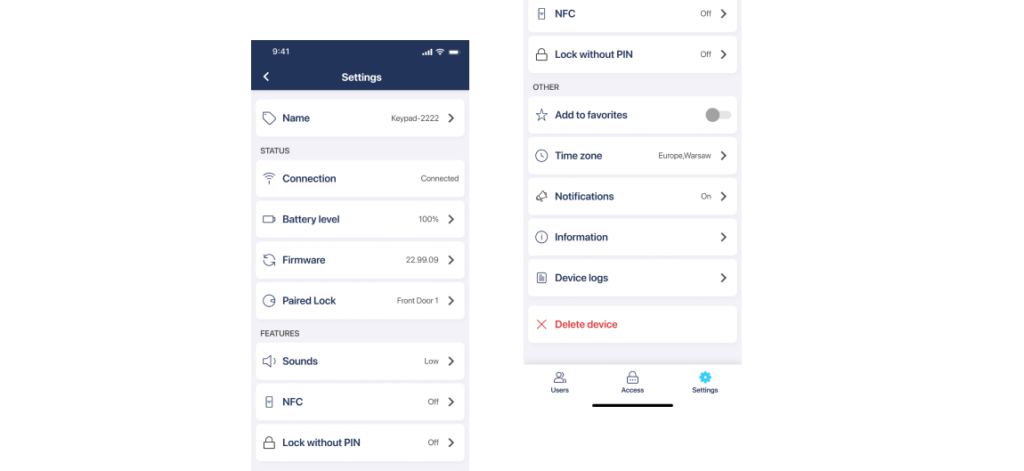
You can access the device configuration by selecting the Settings tab at the bottom of the Tedee Keypad PRO device screen.
Here, you can:
- Rename your device
- Check connection status, battery level, and firmware version
- Unpair it from a smart lock and pair with another
- Adjust the volume of sound signals
- Enable PIN-less manual locking of a smart lock using the keypad’s big button
- Add the device to your favourites
- Edit the operating time zone
- Set up push notifications for device status
- Access detailed device information and service logs
- Remove the device from your account
Battery replacement
You will receive a notification when the device’s battery level drops to 15%, indicating it’s time to replace the batteries. You can check the current battery level in the Settings screen of your Tedee Keypad PRO.
To replace the batteries:
Remove the Tedee Keypad PRO from the wall-mounted plate. If using a wired power supply, remove the seal and unplug it carefully.
Remove the battery plug from the device base and take out the batteries. Dispose of them responsibly.
Insert a new set of batteries and secure the battery cover until you hear a click. The device will activate automatically.
Reconnect the wired power supply, if needed. Place the device back on the wall-mounted plate.
Factory reset
If you need to restore the device to its default settings, follow the reset procedure.
Note: A factory reset will unpair the device from your account and delete all active PINs and fingerprint scans, disabling the keypad. After factory resetting, you’ll need to delete the device from your app account and activate it again.
To factory reset your Tedee Keypad PRO:
Remove the keypad from the mounting plate. If using a wired power connection, unplug the cable.
Take out the battery plug and remove the batteries, if used.
Insert the batteries and/or plug in the power cable.
Ensure the device powers on automatically, indicated by the LED blinking red, green, blue, and white.
Press and hold the ‘0’ and ‘✓’ buttons until the LED lights up red, then release the buttons immediately.
The factory reset is confirmed with three red LED blinks.
Proceed to activate the device again in the Tedee app.


