


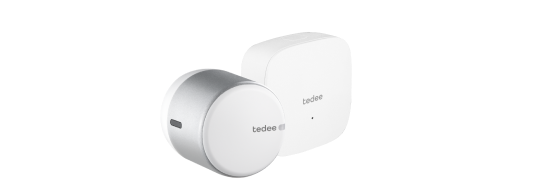





Tedee GO2 Z-Wave
End User Manual
What you need to know
Tedee GO2 Z-Wave is a different product from Tedee GO2. It is not a regular Tedee GO2 with added Z-Wave® connectivity. Tedee GO2 Z-Wave does not offer the same control and integration methods as a Tedee GO2. Read the guide below to learn more about the differences.
Tedee GO2 Z-Wave is designed for the European Z-Wave frequency plan only. Use it only in countries and markets where that Z-Wave frequency plan is supported.
Only purchase and use Tedee GO2 Z-Wave when planning a native integration with a Z-Wave-based alarm or smart home installation. Z-Wave integrations are offered by different platforms, which may use different processes and procedures to connect to and control a smart lock. The guide below provides general guidance and recommendations. For exact procedures of smart lock control, access management, automation, and notifications in your ecosystem, always refer to the documentation of your specific Z-Wave controller system.
Contents
Introduction
Tedee GO2 Z-Wave is a retrofit smart lock designed for wireless integration with local Z-Wave-based smart home and alarm installations. The device supports both classic Z-Wave and Z-Wave Long Range. Availability of Z-Wave Long Range operation depends on support by the controller/hub and the local regional ecosystem.
Z-Wave integration removes the need to use the Tedee app for everyday lock control and access management. Daily control is handled by the local Z-Wave controller. However, some maintenance procedures may still require a temporary connection to the Tedee app and a Tedee account. The exact control methods, automation capabilities, and access-sharing features depend on the specific lock and the smart home platform.
Tedee GO2 vs. Tedee GO2 Z-Wave
Tedee GO2 Z-Wave is a different product from the regular Tedee GO2 model, even though they look similar and are installed on door hardware in the same way.
It is not a standard Tedee GO2 with added Z-Wave connectivity. These devices are not interchangeable and do not operate in the same way. Tedee GO2 Z-Wave does not offer the same control and integration methods as standard Tedee GO or Tedee GO2. The Tedee app is only used temporarily for device firmware update (not unlocking or access sharing). Tedee GO2 Z-Wave can only be paired with Tedee Keypad PRO, and only PIN codes are supported – fingerprints are not available.
Read the guidelines below to learn more about the differences.
Smart lock control
Tedee GO2 Z-Wave can only be controlled using a compatible Z-Wave controller, such as an alarm system or a local smart home hub. All locking and unlocking procedures, access sharing, access management, battery reporting, lock status reporting, and automation are handled by the compatible methods offered by the given Z-Wave controller. The exact feature set depends on the controller platform.
Tedee GO2 Z-Wave supports PIN unlocking with Tedee Keypad PRO. PIN generation and PIN management are handled by the Z-Wave-based integration only.
It is not compatible with Matter or with cloud-based integrations that require Tedee Bridge.
Tedee account and app
Tedee GO2 Z-Wave cannot be locked, unlocked, calibrated, or used for access sharing through the Tedee app.
The Tedee app is only used for temporary connection and firmware update over the Bluetooth-connected smartphone. The app must be logged in using any Tedee account – Tedee GO2 Z-Wave is not permanently linked to any Tedee user.
Accessories
Tedee GO2 Z-Wave does not work with Tedee Bridge, Tedee Dry Contact, Tedee Door Sensor, or Tedee Biometric Module.
Tedee GO2 Z-Wave can be paired with Tedee Keypad PRO for PIN-based access managed through the Z-Wave integration system. Tedee GO2 Z-Wave is not compatible with biometric access using Keypad PRO fingerprint scans.
Installation Considerations
Tedee GO2 Z-Wave is a product variant intended for integration into professional or advanced local installations.
Hardware
Tedee GO2 Z-Wave has the same mechanical construction as Tedee GO2. It therefore uses the same door hardware compatibility rules as the non-Z-Wave Tedee GO2. It works with double-clutch Euro-profile cylinders and with European, Deadbolt, Scandinavian, and Bar adapters, according to the standard Tedee GO2 installation rules.
Z-Wave
Tedee GO2 Z-Wave uses the European Z-Wave frequency plan: 868.4 MHz and 869.85 MHz. This is the Z-Wave frequency used in Europe, the Middle East, Africa, and selected Asian markets.
It is not intended for use in markets that require another Z-Wave regional frequency plan, such as North America, most of Latin America and the Caribbean, Australia/New Zealand markets, India/Pakistan, China, Japan, South Korea, Israel, Hong Kong, or Russia.
The device supports both classic Z-Wave and Z-Wave Long Range, but Z-Wave Long Range requires a compatible controller/hub that also supports Z-Wave Long Range.
Tedee GO2 Z-Wave is a Z-Wave end node: it can be included in a network using Z-Wave Long Range, but it does not include (add) other nodes.
Tedee GO2 Z-Wave uses the Z-Wave S2 Access Control security class and an S2 Security-enabled Z-Wave controller is required to operate the smart lock.
This is the highest-trust S2 class and is intended for access-control devices such as door locks and garage doors.
Tedee GO2 Z-Wave is intended to interoperate with certified Z-Wave controllers. However, SmartStart support, Z-Wave Long Range support, user and credential management, notification handling, automation capabilities, and other procedures may differ between controller hubs and ecosystems. If you have any doubts or issues, consult the documentation of your specific controller hub.
This product can be operated in any Z-Wave network alongside other Z-Wave certified devices from other manufacturers. All mains-operated nodes within the network will act as repeaters regardless of vendor, to increase the reliability of the network.
Bluetooth
Tedee GO2 Z-Wave uses Bluetooth for pairing with Tedee Keypad PRO and for temporary connection to a smartphone running the Tedee app for maintenance purposes, such as manually triggered firmware updates. The smart lock cannot be unlocked via Bluetooth.
Access management
All smart lock control and access-management capabilities, including PIN access when used with Tedee Keypad PRO, are handled by the local Z-Wave integration.
Z-Wave supports user codes and, in newer implementations, richer user and credential structures. However, available control methods, temporary access, schedules, credential and PIN management, logging, and other access-control features may differ between Z-Wave controller platforms. Consult your system provider, integrator, or Z-Wave hub manual for more information.
Batteries
Tedee GO2 Z-Wave is powered in the same way as regular Tedee GO2: three CR123A batteries. If you wish to power Tedee GO2 Z-Wave with rechargeable batteries, use only those offered by Tedee. Standard rechargeable batteries with a peak discharge current below 2.5 A may be unable to deliver sufficient power for proper operation.
Current battery level reporting and low-battery alerts are handled through your Z-Wave controller. The way these values are displayed, refreshed, and used for notifications depends on your integration platform.
QR codes
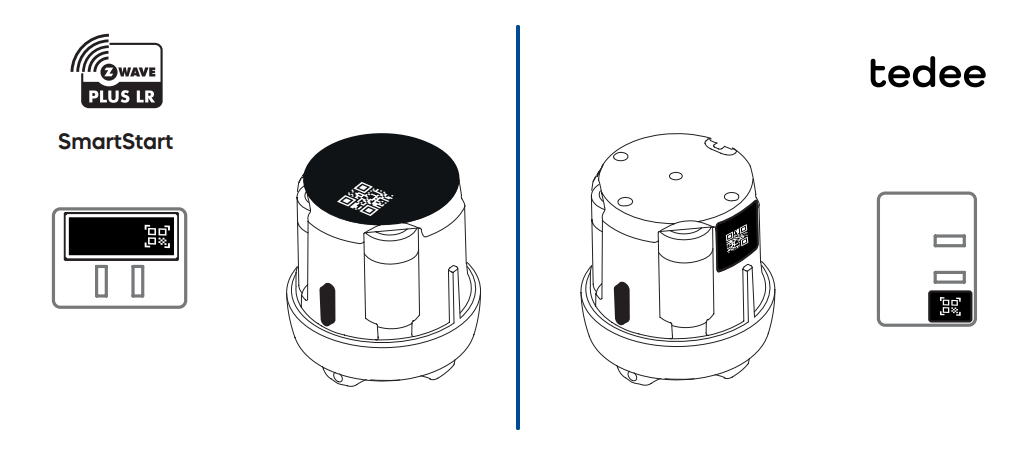
Tedee GO2 Z-Wave comes with two separate sets of numeric codes and QR codes placed on different stickers and in different locations. They serve different purposes and are not interchangeable.
The smart lock box also includes a cardboard Allen-key holder card with stickers on both sides.
1. The Z-Wave QR code and 5-digit PIN are printed on the round sticker beneath the device’s body cover, and the full DSK, QR code, and PIN are on the large white sticker on the cardboard Allen key holder included in the box.
2. The Tedee activation code, in QR and alphanumeric form, used to connect to the Tedee mobile app, is placed on the small black stickers in the corner of the cardboard card and on the side of the smart lock.
Inclusion
Before you start
Proceed with integration only after the smart lock has been installed on the door lock and the battery protection tags have been removed. Follow the standard Tedee GO2 manuals for your chosen installation method.
If the smart lock has been used before, ensure it has been excluded from the previous Z-Wave network. Go to the Exclusion chapter of this guide before proceeding.
Integration with a Z-Wave controller hub can use either the QR code and 5-digit PIN printed on the round sticker under the device’s removable cover, or the full DSK, QR code, and PIN printed on the large white sticker on the included cardboard Allen key holder.
Keep your DSK secure and do not share it with unauthorized persons.
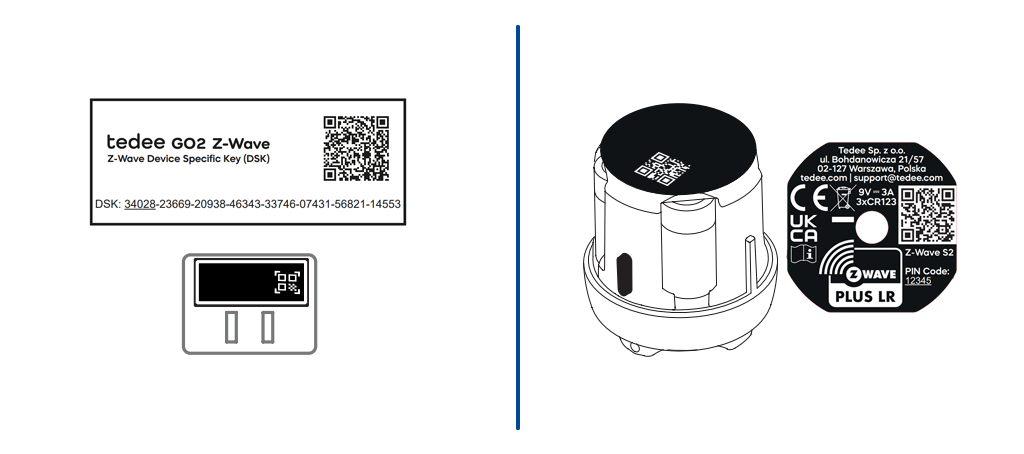
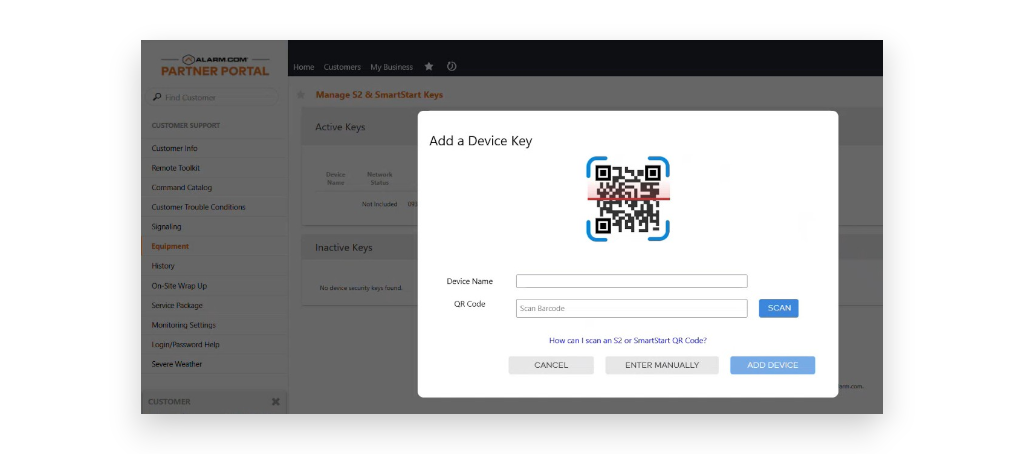
SmartStart enabled products can be added into a Z-Wave network by scanning the Z-Wave QR Code present on the product with a controller providing SmartStart inclusion. No further action is required and the SmartStart product will be added automatically within 10 minutes of being switched on in the network vicinity.
If your hub supports SmartStart, you may use it for the simpler inclusion process. If your hub does not support SmartStart, you may include the smart lock manually, via the classic inclusion process. Choose the appropriate procedure below.
SmartStart Inclusion
SmartStart works by pre-provisioning the device in the controller before the lock joins the network. This removes the need to trigger a manual inclusion sequence on the lock itself.
- Enable SmartStart inclusion on your Z-Wave hub’s control panel.
- Depending on the methods available in your controller, scan the SmartStart QR code, import a photo of the QR code, or enter the lock’s DSK manually. Confirm.
- The control panel reads basic information from the SmartStart process and enables device pre-configuration.
- Set the device name, location, and other available options in the control panel. If your controller supports both classic Z-Wave and Z-Wave Long Range, select the required mode in the controller.
- Activate the integration according to the controller workflow.
- The lock should be added automatically after it is powered on within range of the network. You should receive a notification that the smart lock has been added to your Z-Wave integration within 10 minutes of activation in the control panel.
Proceed to smart lock calibration, which should launch automatically.
Classic Inclusion
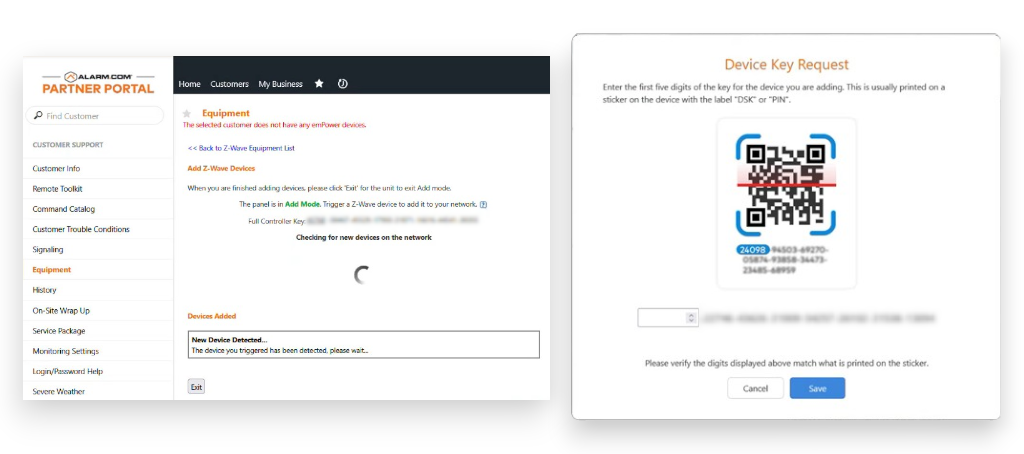
- Set your Z-Wave controller app to inclusion mode.
- Put the lock into Commissioning Mode by triple-clicking the lock button.
- When the lock enters learning mode, the blue LED starts blinking.
- If requested by the controller, enter the 5-digit PIN printed on the sticker underneath the body cover, or as the first five underlined digits of the DSK, as indicated on the Allen-key holder card.
- The controller app confirms the inclusion.
Proceed to smart lock calibration, which is initiated automatically.
Maintenance
Calibration
Calibration is initiated automatically after each smart lock inclusion.
It can also be initiated by pressing the smart lock’s button five times within five seconds to manually trigger recalibration in case of a door lock jam or similar issue.
When calibration is initiated:
- With the smart lock LED blinking red, set the smart lock to the locked position. Press the button once to confirm.
- With the smart lock LED blinking green, set it to the unlocked position. Press the button once to confirm.
- With the smart lock LED blinking green rapidly, you may set up the pull-spring feature:
- To skip pull-spring calibration and leave it disabled, press the button once.
- To calibrate and activate the pull-spring feature, press the button twice rapidly.
When activated, the spring will be automatically retracted at the end of every unlocking operation. To retract the spring on an already unlocked door lock, send another unlock command while the lock remains in the unlocked state.
The smart lock is now ready for operation and configuration using the Z-Wave controller app and other integrated methods.
Pairing with Tedee Keypad PRO
Tedee Keypad PRO can be connected to Tedee GO2 Z-Wave at any time. After pairing the devices, PIN codes are created and managed entirely through your Z-Wave controller. The keypad serves as an input device only – the controller assigns PINs to the lock, and the lock validates them locally.
Before connecting the devices, ensure your Tedee Keypad PRO is not currently paired with any Tedee app account, Tedee smart lock, Tedee Bridge, or Tedee Portal organization. If needed, remove the device from Tedee accounts and perform a factory reset of Tedee Keypad PRO.
Factory reset of Tedee Keypad PRO
- Remove the keypad from the mounting plate. If using wired power, unplug the cable.
- Take out the battery plug and remove the batteries, if used.
- Insert the batteries and/or reconnect the power cable.
- Ensure the device powers on automatically, indicated by the LED blinking red, green, blue, and white.
- Press and hold the 0 and ✓ buttons until the LED lights up red, then release the buttons immediately.
Pairing Tedee Keypad PRO with Tedee GO2 Z-Wave
- Ensure both Tedee GO2 Z-Wave and Tedee Keypad PRO are powered on and no more than 2 m apart.
- Activate discovery mode on both devices:
- Click the smart lock’s button 10 times.
- Click the keypad’s accept ✓ button 10 times.
- Wait for the devices to connect, until both the smart lock and the keypad blink green LED lights.
- If unsure, confirm the pairing by pressing any button on the Tedee Keypad PRO:
- If the LED flashes green – the devices are paired.
- If the LED flashes white – the devices are not paired. Repeat the pairing process.
Tedee Keypad PRO disconnection
Tedee Keypad PRO can only be disconnected from Tedee GO2 Z-Wave by a complete smart lock factory reset. This will erase all device and access configuration data.
If you no longer want to use the Tedee Keypad PRO with your Tedee GO2 Z-Wave, but do not want to reset the smart lock, you may deactivate its PINs in the Z-Wave controller and uninstall the keypad from the doorway instead of permanently unpairing them. A smart lock factory reset would only be required when wanting to pair it with a different keypad.
If you want to disconnect the Tedee Keypad PRO from your Tedee GO2 Z-Wave smart lock:
- Exclude your Tedee GO2 Z-Wave from the controller, following this guide.
- Perform a factory reset of Tedee GO2 Z-Wave, following this guide.
- Integrate your smart lock with the Z-Wave controller again.
Before using Tedee Keypad PRO with another smart lock, perform its factory reset.
Firmware Update
To ensure the best available operation of your Tedee GO2 Z-Wave smart lock, regular firmware updates are recommended. Firmware updates are available through the Tedee app for users who temporarily connect the device for maintenance purposes.
Connecting the smart lock to the app is not limited to any specific user and is temporary only – Tedee GO2 Z-Wave cannot be permanently added or saved in a user’s Tedee account.
Tedee app connection
- To connect Tedee GO2 Z-Wave to the Tedee app, launch the app on your mobile device and log in.
- Open the sidebar menu and tap Add new device.
- Tap Add new device below any of the products shown in the slideshow.
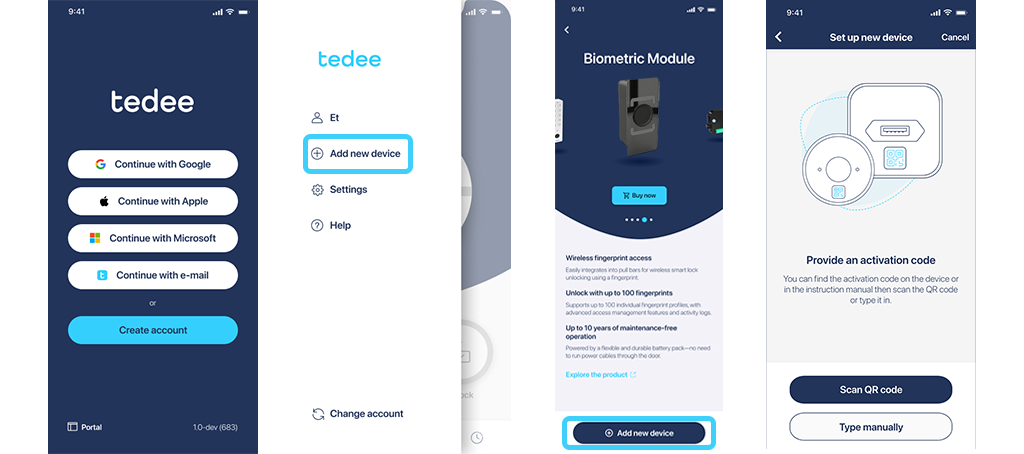
- The app will ask for your device’s activation code. With Tedee GO2 Z-Wave, the Tedee activation code is placed in two locations:
- On the Allen-key holder card included in the smart lock box, on a small black sticker in the corner of the card.
- On the device, underneath the body cover, on a sticker on the side of the smart lock.
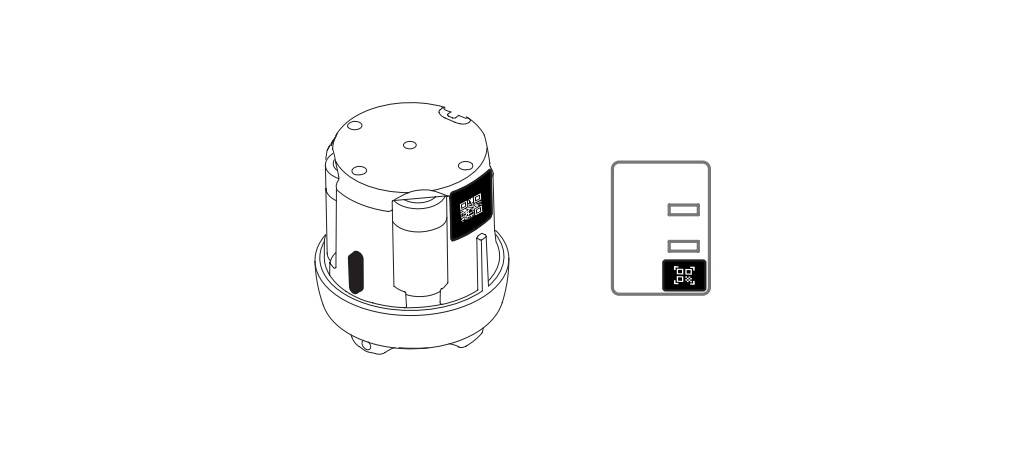
Be aware that both the device and the card also contain other QR codes used for Z-Wave hub integration. To connect the smart lock to the Tedee app, use only the Tedee activation code shown in the areas above.
- Scan the QR code or enter the alphanumeric code manually and confirm. The smartphone will connect to Tedee GO2 Z-Wave using Bluetooth.
- If a new firmware version is available, the firmware update starts automatically.
- Afterwards, the app displays the device serial number and firmware versions of the Tedee and Z-Wave modules.
Factory Reset
You may perform the smart lock’s factory reset in case of technical problems or when required by a service procedure. A factory reset clears the device-side network information and settings stored in the lock, including the pairing with Tedee Keypad PRO.
Please use this procedure only when the network’s primary controller is missing or otherwise inoperable.
To perform a factory reset on Tedee GO2 Z-Wave:
- Take the smart lock off the door lock after loosening the screws.
- Place the device button-side up on a flat surface.
- Press and hold the button until the red LED lights up. Release the button.
After the LED blinks with three red flashes, the device has been restored to factory settings.
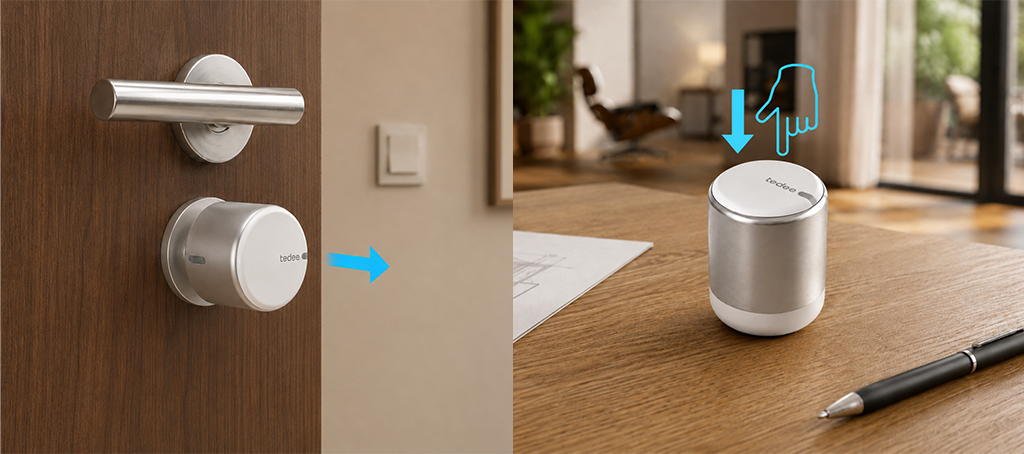
If you want to reconnect the smart lock with the same Z-Wave controller:
- When the device was provisioned with SmartStart: the device can be reintegrated by activating the connection in the Z-Wave controller panel again, as the provisioning entry may still remain on the controller.
- When the device was provisioned manually: it can be manually included again.
If you want to connect the smart lock to another Z-Wave controller:
- the device must be properly excluded using the designated process before being added to another installation.
Identity Function
The Tedee GO2 Z-Wave lock can be visually identified from the controller using the Indicator Command Class (version 3) with the Node Identify indicator, Indicator ID 0x50. When the controller sends an Indicator Set for Indicator ID 0x50, the lock blinks its blue LED with the requested pattern so the user can locate the physical device.
The blink pattern is defined by the three indicator property values sent with Indicator ID 0x50:
- Property 0x03 – On/Off Period Length (in 1/10 s): the duration of a single blink (on + off) cycle.
- Property 0x04 – On/Off Number of Cycles: how many blink cycles to run; 0xFF = blink continuously until stopped.
- Property 0x05 – On Time (in 1/10 s): how long within each period the LED stays on; 0x00 means a symmetric blink (on time = off time = half the period).
Setting Indicator ID 0x50 with On/Off Period Length = 0 stops the identification. The current identify state can be read back with an Indicator Get for Indicator ID 0x50, which returns the active property values.
Example: an Indicator Set with Indicator ID 0x50, On/Off Period Length = 0x0A (1 s), On/Off Number of Cycles = 0x05 and On Time = 0x00 makes the LED blink five times with a one-second symmetric cycle.
Exclusion
When you decide to stop using Tedee GO2 Z-Wave in your integration, you must remove it from the Z-Wave system. Standard exclusion using an existing Z-Wave controller is the recommended method.
After successful exclusion, the controller and other devices in that network can no longer communicate with or control the lock. The lock is removed from that Z-Wave network on the device side.
Exclusion maintains the smart lock’s pairing with the existing Tedee Keypad PRO. The devices can still be used together with another controller after reintegration.
Exclusion from your Z-Wave controller
- Using the Z-Wave controller, go to the list of devices and find the smart lock.
- If available, open Device information or a similar screen and look for Delete, Remove device, or Exclusion. The controller will enter exclusion mode.
- Put the lock into Commissioning Mode by triple-clicking the lock button. When the lock enters learning mode, the blue LED starts blinking.
- Your Z-Wave control panel should confirm the exclusion.
If Tedee GO2 Z-Wave was previously added using SmartStart and you do not want it to rejoin that installation, also delete its SmartStart entry from the controller after exclusion.
Exclusion using any Z-Wave controller
If you want to reset the Z-Wave capabilities of the Tedee GO2 Z-Wave smart lock using a control panel it was not previously integrated with, follow the steps below:
- Enable the general exclusion mode of the available Z-Wave control panel. Look for options such as Remove foreign device, General exclusion, or Z-Wave exclusion.
- Put the lock into Commissioning Mode by triple-clicking the lock button. When the lock enters learning mode, the blue LED starts blinking.
- Your Z-Wave control panel should confirm the exclusion.
Z-Wave Specifications
Basic Command Class
The device does not implement Basic Command Class functionality of its own. Basic Command Class is mapped to the Door Lock Command Class, so a controller using generic Basic commands can still lock and unlock the door. A Basic Set is routed to a Door Lock Operation Set, and the value reported in a Basic Get / Report is derived from the current Door Lock mode.
| Basic Command | Door Lock Mapped Command |
| Basic Set (Value = 0x00) | Door Lock Operation Set (Door Lock Mode = 0x00 – Door Unsecured / unlock) |
| Basic Set (Value = 0xFF) | Door Lock Operation Set (Door Lock Mode = 0xFF – Door Secured / lock) |
| Basic Get | Door Lock Operation Get |
| Basic Report (Current Value = 0x00) | Door Lock Operation Report (Door Lock Mode = 0x00 – Door Unsecured / unlocked) |
| Basic Report (Current Value = 0xFF) | Door Lock Operation Report (Door Lock Mode = 0xFF – Door Secured / locked) |
| Basic Report (Target Value, Duration) | Door Lock Operation Report (Door Lock Target Mode, Duration) |
Note: Basic value mapping: 0x00 = Door Unsecured (unlocked), 0xFF = Door Secured (locked). When the current door mode is unknown — for example while the lock is not yet calibrated or its real position has not been confirmed — the Basic Report Current Value is 0xFE (unknown). While a lock/unlock operation is in progress the Basic Report also carries the target value and the remaining duration, mirroring the Door Lock transition.
Supported Command Classes
| Command Class | Command Class number | Version | Required Security Class |
| Association | 0x85 | 2 | S0 or S2 Access Control |
| Association Group Info | 0x59 | 3 | S0 or S2 Access Control |
| Basic | 0x20 | 2 | S0 or S2 Access Control |
| Battery | 0x80 | 1 | S0 or S2 Access Control |
| Configuration | 0x70 | 4 | S0 or S2 Access Control |
| Device Reset Locally | 0x5A | 1 | S0 or S2 Access Control |
| Door Lock | 0x62 | 4 | S0 or S2 Access Control |
| Firmware Update Meta Data | 0x7A | 5 | S0 or S2 Access Control |
| Indicator | 0x87 | 3 | S0 or S2 Access Control |
| Manufacturer Specific | 0x72 | 2 | S0 or S2 Access Control |
| Multi-Channel Association | 0x8E | 3 | S0 or S2 Access Control |
| Notification | 0x71 | 8 | S0 or S2 Access Control |
| Power Level | 0x73 | 1 | S0 or S2 Access Control |
| Schedule Entry Lock | 0x4E | 3 | S0 or S2 Access Control |
| Security 0 | 0x98 | 1 | None |
| Security 2 | 0x9F | 1 | None |
| Supervision | 0x6C | 1 | None |
| Time | 0x8A | 2 | S0 or S2 Access Control |
| Time Parameters | 0x8B | 1 | S0 or S2 Access Control |
| Transport Service | 0x55 | 2 | None |
| User Code | 0x63 | 2 | S0 or S2 Access Control |
| Version | 0x86 | 3 | S0 or S2 Access Control |
| Z-Wave Plus Info | 0x5E | 2 | None |
Configuration Parameters
The Configuration Command Class (version 4) is used to read and, where permitted, change the device’s manufacturer-specific configuration parameters listed below.
Configuration Bulk commands are not supported. The Configuration Properties Report advertises the “No Bulk support” flag (Properties2, bit 1) for every parameter. A Configuration Bulk Get or Bulk Set received without Supervision encapsulation is answered with an Application Rejected Request command; the same command received with Supervision encapsulation returns a Supervision Report with status NO_SUPPORT (NOT_SUPPORTED).
Parameter 1 – Keypad paired
| Parameter number | 1 |
| Name | Keypad paired |
| Size | 1 byte |
| Minimum value | 0 |
| Maximum value | 1 |
| Defult value | 0 |
| Read-only | true |
| Advanced | false |
| Description | Tedee Keypad pairing status. 0 = no keypad paired, 1 = a Tedee Keypad is paired. |
Parameter 2 – Keypad battery
| Parameter number | 2 |
| Name | Keypad battery |
| Size | 1 byte |
| Minimum value | 0 |
| Maximum value | 100 |
| Defult value | 0 |
| Read-only | true |
| Advanced | false |
| Description | Paired Tedee Keypad battery level, in percent. 0 = unavailable/unknown (no keypad paired, no data, or data older than 7 days); 1–100 = battery percentage. |
Parameter 3 – Pull spring calibrated
| Parameter number | 3 |
| Name | Pull spring calibrated |
| Size | 1 byte |
| Minimum value | 0 |
| Maximum value | 1 |
| Defult value | 0 |
| Read-only | true |
| Advanced | false |
| Description | Pull-spring calibration status. 0 = not calibrated, 1 = calibrated. |
Parameter 4 – Button open enable
| Parameter number | 4 |
| Name | Button open enable |
| Size | 1 byte |
| Minimum value | 0 |
| Maximum value | 1 |
| Defult value | 1 |
| Read-only | false |
| Advanced | false |
| Description | Allow the lock’s physical button to open (unlock) the lock. 0 = disabled, 1 = enabled. |
Parameter 5 – Button close enable
| Parameter number | 5 |
| Name | Button close enable |
| Size | 1 byte |
| Minimum value | 0 |
| Maximum value | 1 |
| Defult value | 1 |
| Read-only | false |
| Advanced | false |
| Description | Allow the lock’s physical button to close (lock) the lock. 0 = disabled, 1 = enabled. |
Notification Parameters
The device reports state changes through the Notification Command Class (version 8). The table below lists every supported notification.
| Name | Description | Notification Type | Event |
| Manual Lock Operation | The lock was locked manually (physical button / knob on the lock). | Access Control (0x06) | 0x01 |
| Manual Unlock Operation | The lock was unlocked manually (physical button / knob on the lock). | Access Control (0x06) | 0x02 |
| RF Lock Operation | The lock was locked remotely over Z-Wave (RF). | Access Control (0x06) | 0x03 |
| RF Unlock Operation | The lock was unlocked remotely over Z-Wave (RF). | Access Control (0x06) | 0x04 |
| Keypad Lock Operation | The lock was locked from the Tedee Keypad. | Access Control (0x06) | 0x05 |
| Keypad Unlock Operation | The lock was unlocked from the Tedee Keypad (valid user code). | Access Control (0x06) | 0x06 |
| Lock Jammed | The lock mechanism jammed and could not reach the requested position. | Access Control (0x06) | 0x0B |
| All User Codes Deleted | All keypad user codes were deleted. | Access Control (0x06) | 0x0C |
| Single User Code Deleted | A single keypad user code was deleted. | Access Control (0x06) | 0x0D |
| New User Code Added | A new keypad user code was added. | Access Control (0x06) | 0x0E |
| New User Code Not Added Due to Duplicate Code | A new user code was rejected because an identical code already exists. | Access Control (0x06) | 0x0F |
| Tampering, Invalid Code | Too many invalid code attempts on the keypad (tampering / invalid code). | Home Security (0x07) | 0x04 |
Association Groups
Tedee GO2 Z-Wave supports one association group, the Lifeline group. It is used to send unsolicited reports to the associated Node ID destinations (typically the Z-Wave controller). The commands issued to the group and the actions that trigger them are listed below.
Group mapping: Tedee GO2 Z-Wave is a single Root Device with no End Points, so there is no mapping between association groups (no Root Device / End Point group mirroring).
Association Table
| Group ID | Maximum Nodes | Description | Commands |
| 1 | 5 | Lifeline (profile General: Lifeline, 0x0001) | Command Class Door Lock (0x62) – Door Lock Operation Report (0x03) – Door Lock Configuration Report (0x06) Command Class Notification (0x71) – Notification Report (0x05) Command Class User Code (0x63) – User Code Report (0x03) Command Class Configuration (0x70) – Configuration Report (0x06) Command Class Indicator (0x87) – Indicator Report (0x03) Command Class Battery (0x80) – Battery Report (0x03) Command Class Device Reset Locally (0x5A) – Device Reset Locally Notification (0x01) |
Lifeline Report Trigger Table
| Report Command | RF Trigger | Manual Trigger |
| Door Lock Operation Report (0x6203) | Door Lock Operation Set | Manual or keypad lock/unlock (door lock mode changed) |
| Door Lock Configuration Report (0x6206) | Door Lock Configuration Set | Pull-spring (re)calibration restores the default Hold and Release time (when it had been disabled) |
| Notification Report – Access Control (0x7105) | RF lock/unlock operation | Manual/keypad lock/unlock, lock jammed, or user code added/deleted via keypad |
| Notification Report – Home Security (0x7105) | – | Too many invalid keypad code attempts (tampering) |
| User Code Report (0x6303) | User Code Set | User code added/deleted via keypad |
| Configuration Report (0x7006) | Configuration Set (parameters 4/5) | Tedee parameter change reported by the lock (keypad paired/battery, pull-spring calibration, button settings) |
| Indicator Report (0x8703) | Indicator Set | Blink sequence completed |
| Battery Report (0x8003) | Any RF lock/unlock operation that changes the battery level by at least 1% | Any manual/keypad operation that changes the battery level by at least 1%; also a periodic report every 24 h. When the level drops below 15% a low-battery warning is reported. |
| Device Reset Locally Notification (0x5A01) | – | Factory (default) reset performed |
Supervision Command Class
The Tedee GO2 Z-Wave lock supports the Supervision Command Class (version 1). A controller can encapsulate a supported command in a Supervision Get to receive a Supervision Report confirming the result. For a valid and supported command the returned status is one of SUCCESS, WORKING or FAIL.
WORKING is used only for the Door Lock Operation Set command (and the Basic Set that maps to it). The bolt is physically moved by the lock and the movement takes a few seconds, so the device first replies with a Supervision Report WORKING carrying the estimated remaining Duration. When the movement finishes it sends a final Supervision Report with SUCCESS if the lock reached the requested position, or FAIL if it could not. (WORKING is only used for a singlecast Supervision Get.)
A Door Lock Operation Set / Basic Set with a valid door lock mode results in a final Supervision Report with status FAIL when the lock cannot complete the movement, namely:
- the lock is not calibrated, or
- the lock mechanism is jammed.
In every other case the operation completes and the final Supervision Report status is SUCCESS.
All other supported commands (for example Configuration Set, User Code Set, Indicator Set, Door Lock Configuration Set, Notification Set, Association Set) are handled immediately; for a valid and supported set of parameters they return a single Supervision Report with status SUCCESS, without a WORKING phase.


