Tedee Door Sensor
User guide and installation manual
Contents
- Introduction
- Key features
- Device elements
- Smart lock compatibility
- Wireless connection
- Tedee Bridge
- Installation Considerations
- Battery
- Battery access
- Door considerations
- Device orientation
- Device placement
- Non-rebated doors
- Rebated doors
- Installation
- Inserting a battery
- Test installation
- Activation
- Calibration
- Final installation
- Features & Configuration
- Door status
- Locking automation
- Locking prevention
- Automatic locking
- App locking
- Security alerts
- Activity logging
- Maintenance
- Settings
- User management
- Battery replacement
- Device deinstallation
- Factory reset
Introduction
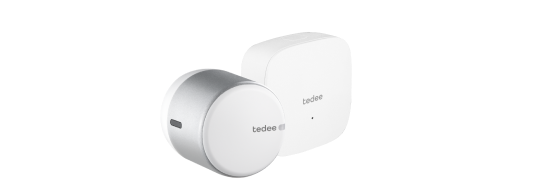
The Tedee Door Sensor consists of two parts – a sensor and a magnet – mounted on the door leaf and door frame on the inside of the apartment. By verifying the door’s position through measuring the distance between the sensor and magnet, the device detects whether a door is open or closed, enhancing the logic of the Tedee smart lock.
Key features
- Prevents locking of a smart lock when the door is open.
- Locks the door automatically as soon as it’s closed.
- Displays the door’s open/closed status in the Tedee app, alongside the current state of the smart lock.
- Push notification security alerts are sent if the door remains open for an extended period.
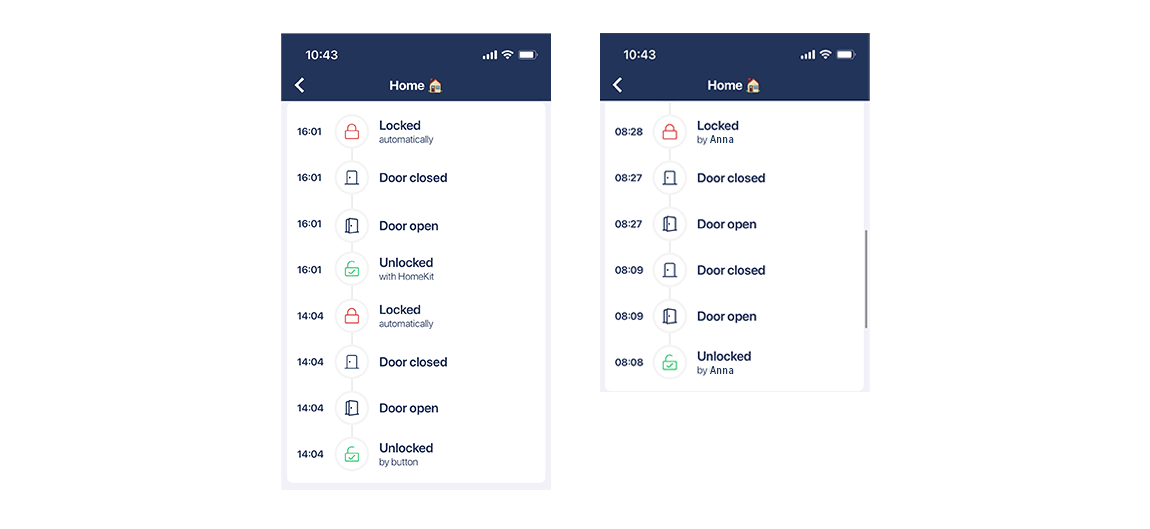
- Logs all door openings and closings in the smart lock’s activity log.
Note: Remote functionalities require pairing a smart lock with a Wi-Fi-connected Tedee Bridge.
Device elements
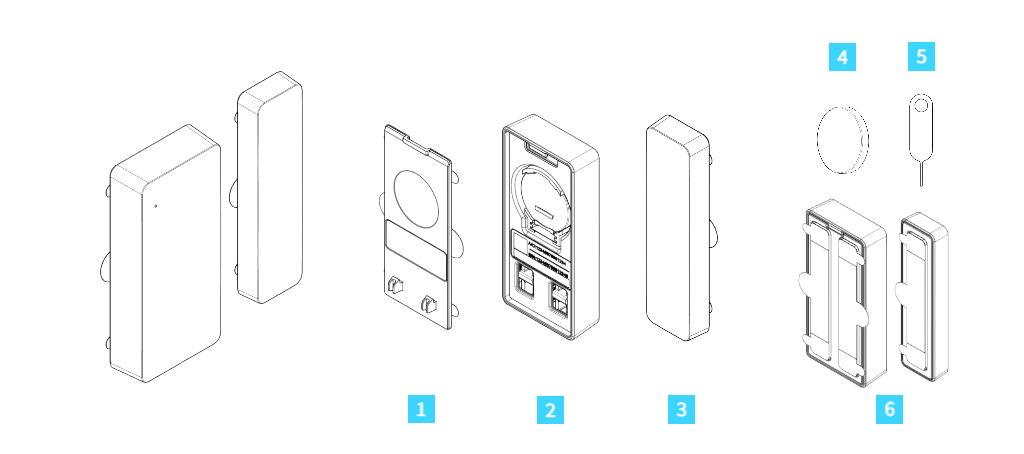
The Tedee Door Sensor consists of several elements:
- Battery cover
- Sensor
- Magnet
- CR2032 battery
- Battery cover opening pin – accessory used for battery replacement
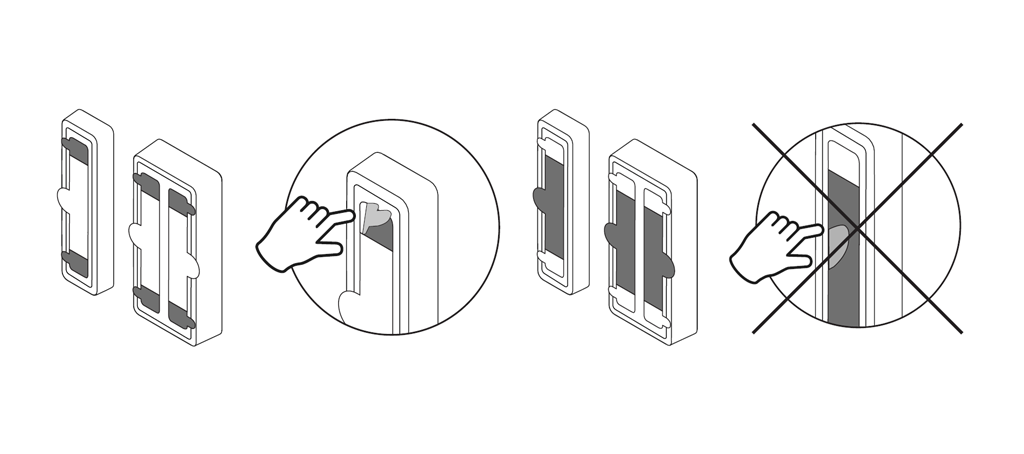
- Adhesive pads – pre-applied on the magnet and sensor, used for installation. Perforated for non-permanent, test installations.
Smart lock compatibility
The Tedee Door Sensor works exclusively with Tedee PRO, Tedee GO, and Tedee GO2 smart locks.
Each Tedee Door Sensor can only be used with one smart lock at a time.
Wireless connection
The Tedee Door Sensor connects to the Tedee smart lock via Bluetooth, transferring the closed/open door status exclusively between these devices.
The door status information is used by the smart lock to synchronize automatic locking features and log door openings/closings if enabled.
The Tedee Door Sensor connects to a smartphone via Bluetooth for on-demand battery-level checks or firmware updates.
The device can operate with or without a Tedee Bridge in the user’s ecosystem. For maximum protection and remote capabilities, it is recommended to pair the Tedee smart lock with a Tedee Bridge.
Tedee Bridge
If the smart lock paired with the Tedee Door Sensor is connected to a Wi-Fi-connected Tedee Bridge, the door status is accessible live and remotely via the Tedee app. Openings/closings are instantly logged, and the user receives enabled security alerts if the door is left open beyond a preset limit.
The Tedee Door Sensor connects directly to the Tedee Bridge only to check for available automatic firmware updates.
If the device is paired with a smart lock without a Tedee Bridge or if the internet connection is temporarily unavailable, the Tedee Door Sensor still enhances automatic locking and/or logs additional activities if enabled. In such setups, door status updates are sent to the app via Bluetooth in proximity to the smart lock.
Features not requiring the Tedee Bridge
- Prevents locking of an open door.
- Locks the door automatically as soon as it’s closed
- Logs door openings and closings after connecting via Bluetooth.
Features requiring the Tedee Bridge
- Current door status available remotely.
- Security alerts about a door left open for a prolonged period.
- Real-time logging of door openings and closings in app activity logs.
- Automatic firmware updates.
Installation Considerations
Before installing the Tedee Door Sensor, read all guidelines below carefully for optimal safety, correct positioning, and efficient operation.
Battery
The sensor unit of the Tedee Door Sensor is battery-powered.
WarningINGESTION HAZARD: This product contains a button cell or coin battery. DEATH or serious injury can occur if ingested. A swallowed button cell or coin battery can cause Internal Chemical Burns in as little as 2 hours. KEEP new and used batteries OUT OF REACH OF CHILDREN. Seek immediate medical attention if a battery is suspected to be swallowed or inserted inside any part of the body. |
The battery-powered Tedee Door Sensor includes a single non-rechargeable and non-user-serviceable CR2032 battery. Only 3V batteries are permitted.
Risk of permanent device damage and warranty void if batteries exceeding 3.3V are installed!
A new battery allows the Tedee Door Sensor to operate for up to 2 years. When battery levels drop to 15%, users receive a notification via the Tedee app.
The magnet element of the Tedee Door Sensor does not require a power supply.
Battery access
Post-installation maintenance includes periodic battery replacement.
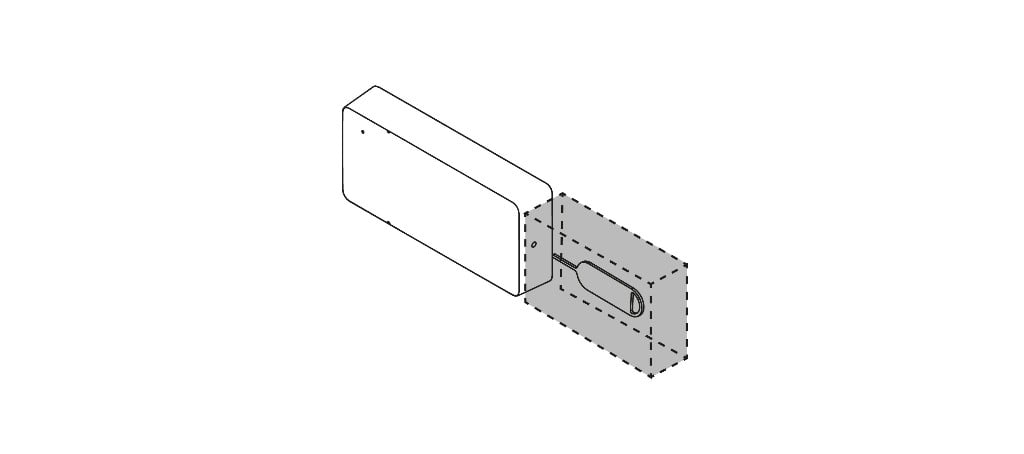
The battery is protected inside the device, accessible only by opening the battery cover with the provided opening pin inserted into the bottom of the Tedee Door Sensor.
When installing, keep the battery cover opening slot accessible at all times. Do not cover battery access.
Door considerations
Install the Tedee Door Sensor on the interior side of the property.
The device consists of two elements – a sensor and a magnet. One piece is mounted on the door leaf, and the other on the door frame or wall. Installation locations depend on individual door configurations; follow detailed instructions provided.
Install device units on the door edge farthest from the hinges. Avoid installing near hinges.
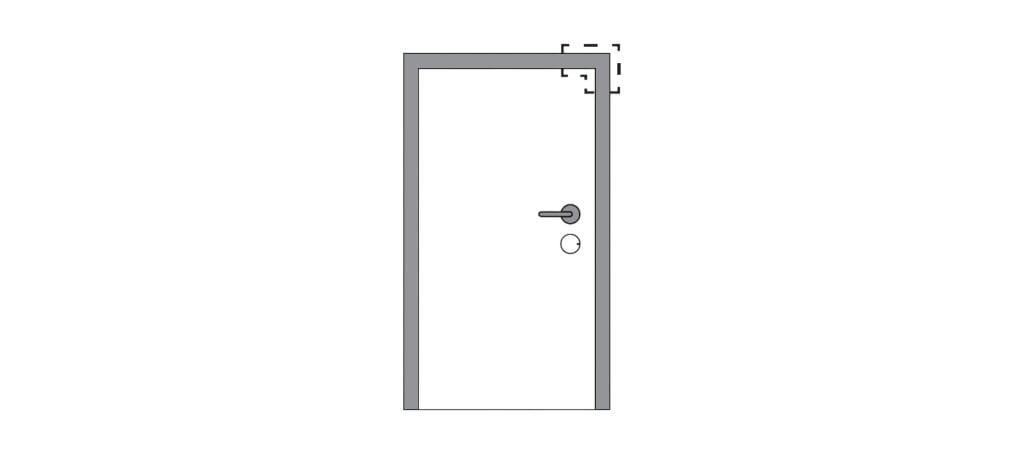
Horizontal installation on the door’s top edge is recommended. Vertical installation on the outer top edge may be unsuitable for some doors.
Device orientation
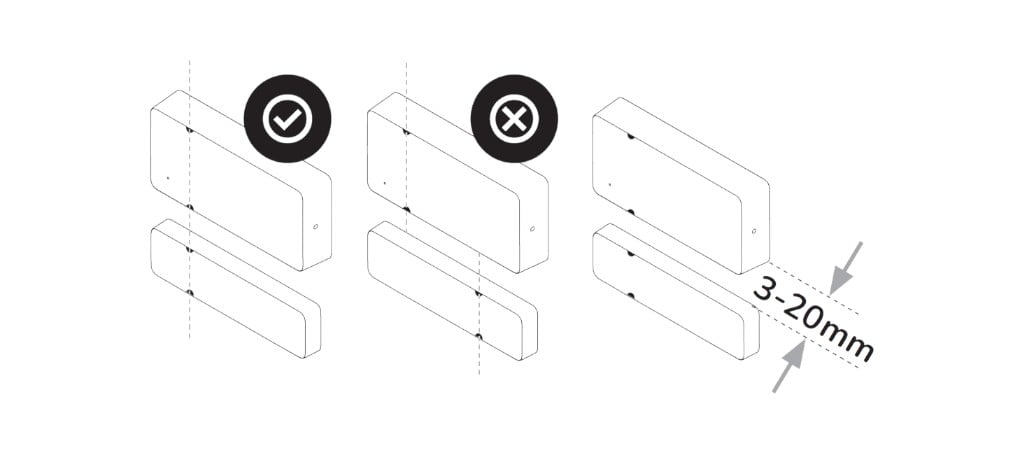
Both sensor and magnet elements have printed half-dot markings on one side. When installing, align these markings on both units in a single line.
The recommended gap between magnet and sensor on a closed door is 3–20 mm.
As long as the markings on both pieces align, the devices can be placed symmetrically on both sides.
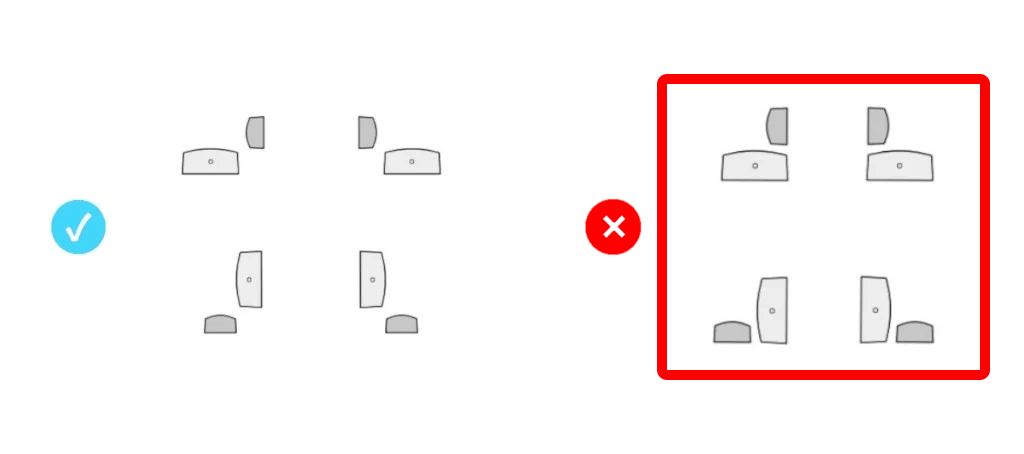
As viewed from side or front, position both units on the same plane or at a diagonal 90-degree angle, maintaining recommended distances.
Ensure units face each other’s sides or corners, avoiding direct front-to-side positioning.
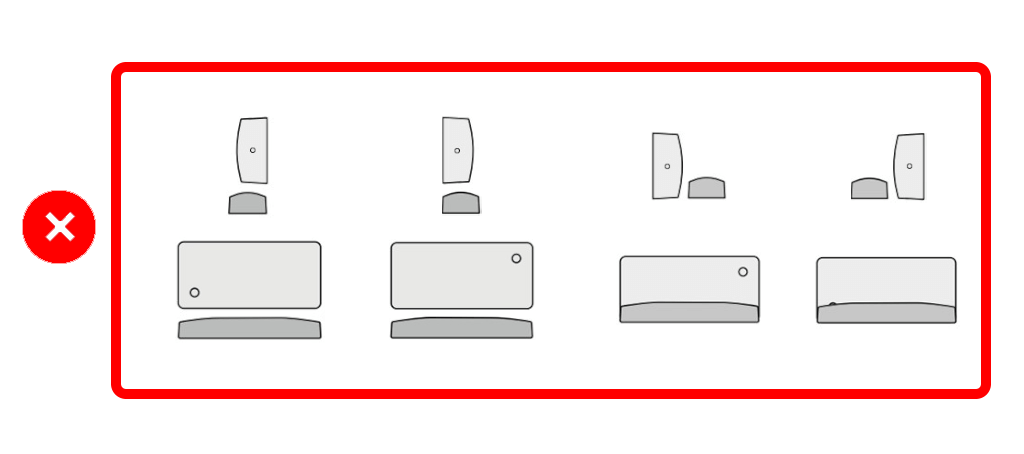
Do not arrange units with any unit’s front facing directly toward the other unit’s side.
Device placement
The exact configuration of Tedee Door Sensor elements depends on the door edge profile (rebated / non-rebated) and the inward/outward opening direction.
Always install the Tedee Door Sensor on the inside of the property, where the smart lock is installed.
In case of non-standard installations or issues, contact the Tedee Support Team at [email protected]
Non-rebated doors
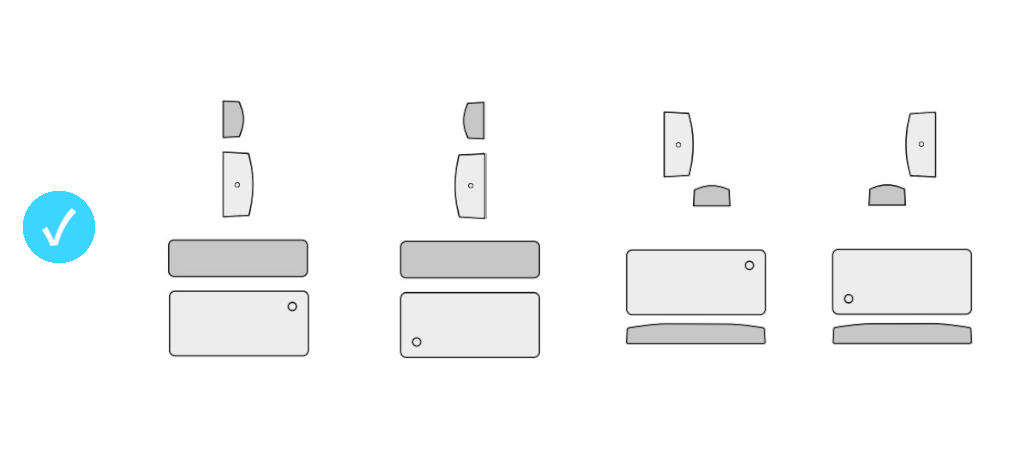
On doors with a flat profile and the door frame flush with the door leaf, the Tedee Door Sensor elements should be mounted side by side on the top edge of the door, regardless of inward/outward opening direction.
It is recommended to install the sensor piece on the door leaf, with the magnet unit placed on the door frame.
Rebated doors
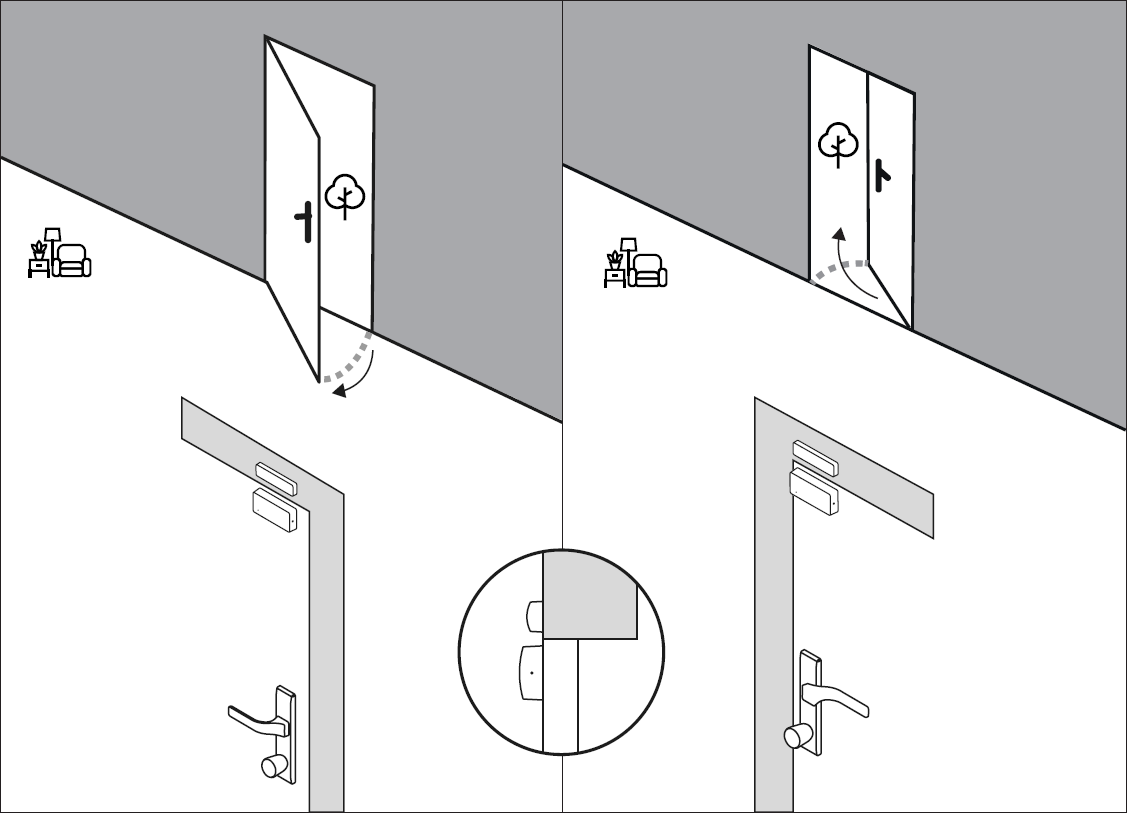
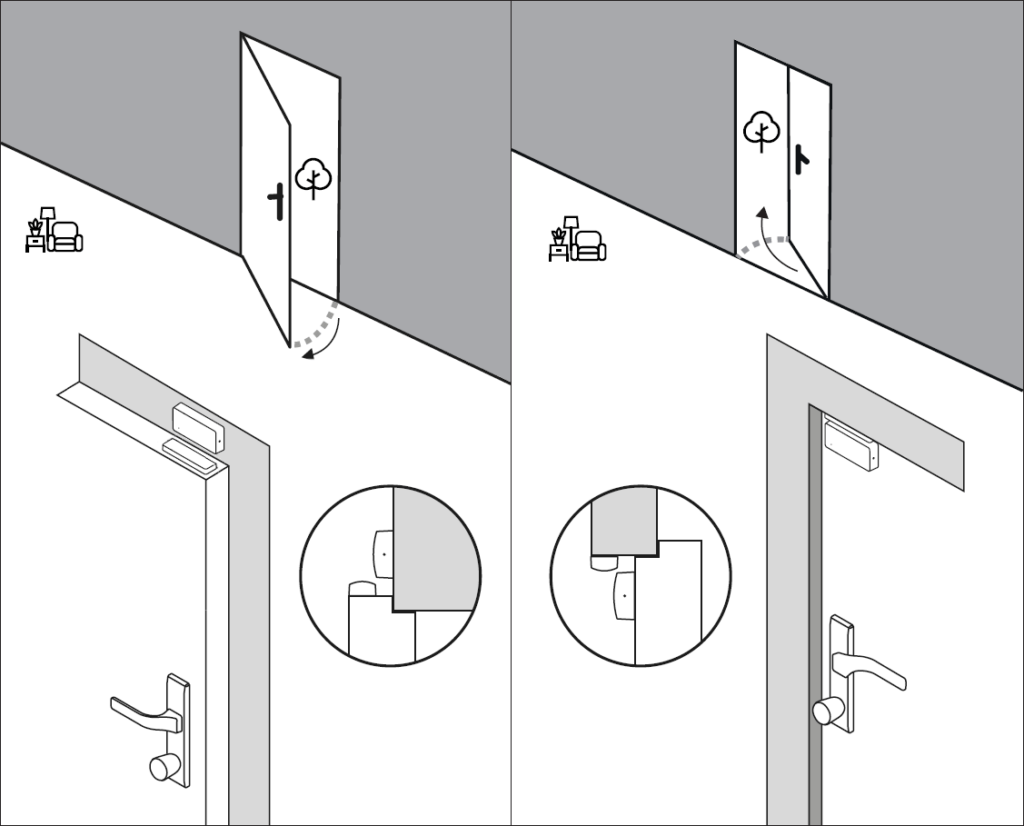
With door leaves recessed or protruding from the wall, the sensor and magnet units are to be installed at a 90-degree angle, with the corners of the elements facing each other diagonally.
Do not arrange units with any unit’s front facing directly toward the other unit’s side. Keep the diagonal arrangement of elements to avoid positioning any element’s front directly facing the other element’s side.
On inward-opening doors
- Place the sensor unit on the door frame. Leave space for diagonal arrangement of the magnet unit.
- Place the magnet unit on the door leaf’s top edge, diagonally arranged from the sensor.
On outward-opening doors
- Place the sensor unit on the door leaf, leaving ample space underneath the door frame for the magnet installation.
- Place the magnet unit on the door frame’s top bar, maintaining distance from the door leaf to ensure a diagonal arrangement of the elements.
Installation
With a chosen arrangement of sensor and magnet units, proceed with the Tedee Door Sensor installation on your door.
Inserting a battery
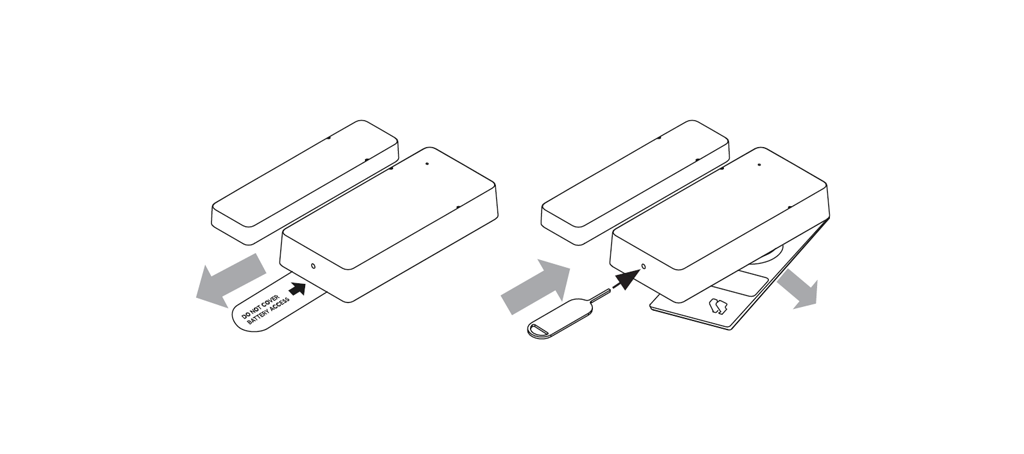
Remove the protective tag from the battery cover.
Insert the opening pin into the slot at the bottom of the sensor and open the battery cover.
Unpack the CR2032 battery from the Tedee Door Sensor box.
Insert the battery with the positive “+” pole facing upwards by placing its edge under the pin at the bottom of the device.
Press the opposite edge of the battery downwards until you hear a click, signifying a secure battery mount. The device turns on automatically.
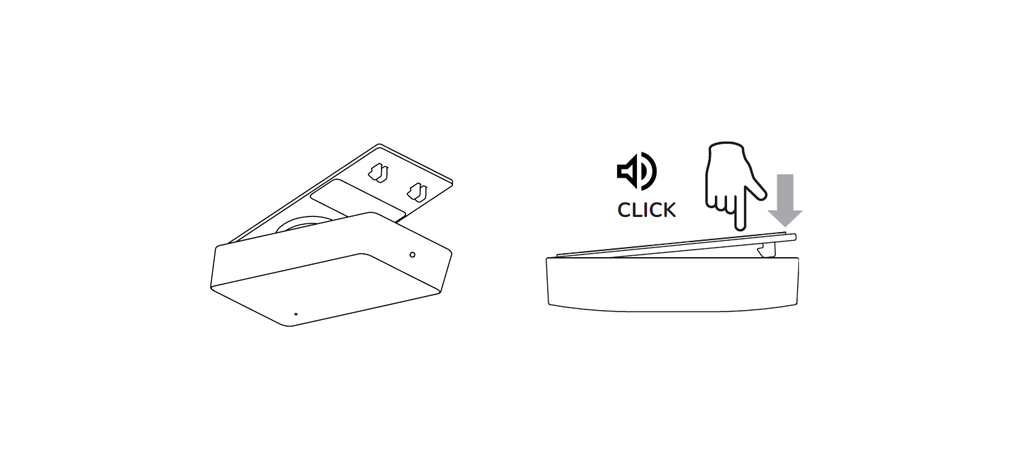
Replace the battery cover. Begin by placing the battery flap edge underneath the hinge on the sensor body.
Press down the opposite end of the battery flap until you hear the double latch click into place.
Test installation
The Tedee Door Sensor is installed using pre-applied adhesive pads.
The pads on the back of the sensor and magnet units are perforated and divided into three pieces each. The perforation allows removing only part of the protective foil at a time and temporarily installing the device for calibration.
If during calibration in the Tedee app the device requires repositioning, it can easily be removed and reapplied again.
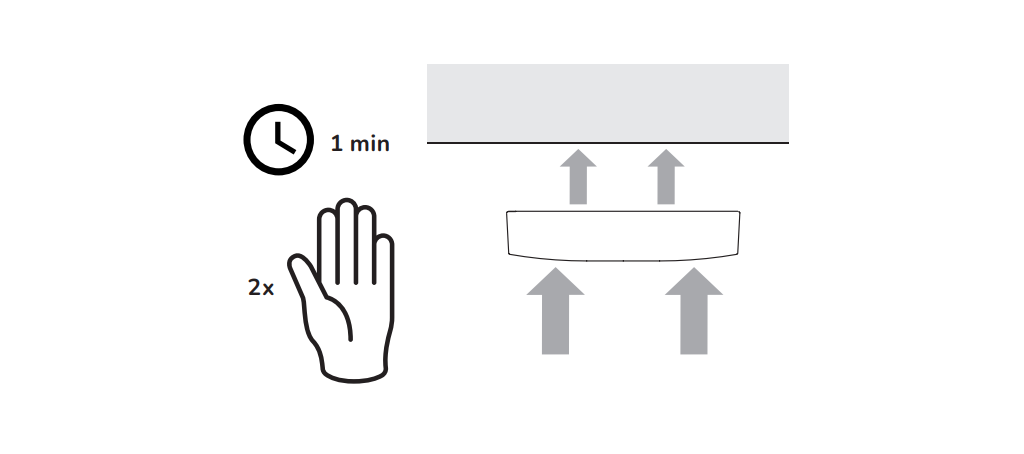
Note: About 15 minutes after the initial application, the adhesive pad’s grip becomes very strong. Make sure to launch calibration and fine-tune the position shortly after removing the protective foil.
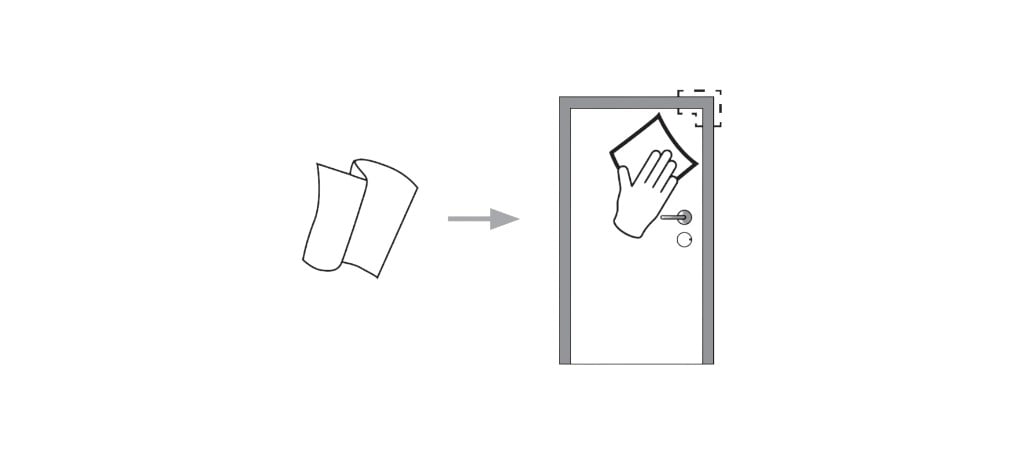
Start by cleaning the door and door frame surfaces with a cloth and household detergent.
Remove six small protective foil fragments from the edges of the sensor and magnet units.
Do not yet remove the central pieces of the protective foil.
According to the chosen arrangement, apply both sensor and magnet units onto the door and door frame.
Proceed to device activation.
Activation
Ensure you have Owner credentials for the smart lock you wish to use with your Tedee Door Sensor.
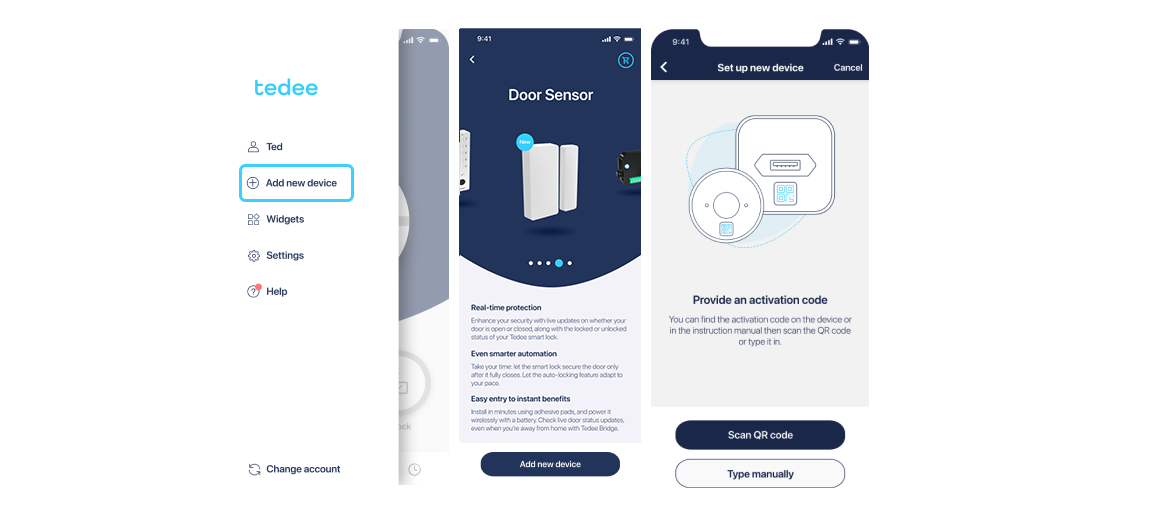
Launch the Tedee app on your smartphone and log in if necessary.
Select “Add new device” from the sidebar menu. Scroll to the Tedee Door Sensor and select “Add new device”.
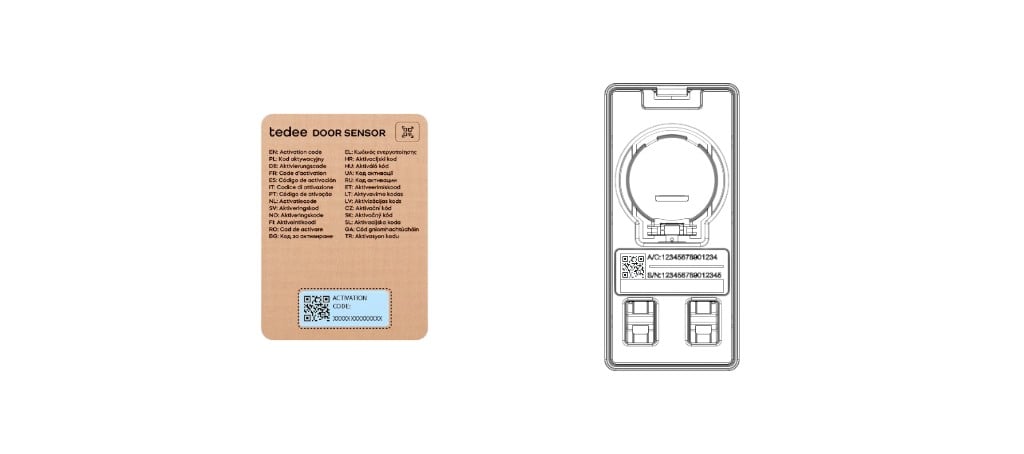
Scan the activation code for your Tedee Door Sensor, provided on the card included in the device box or printed on the sticker underneath the battery cover.
Calibration
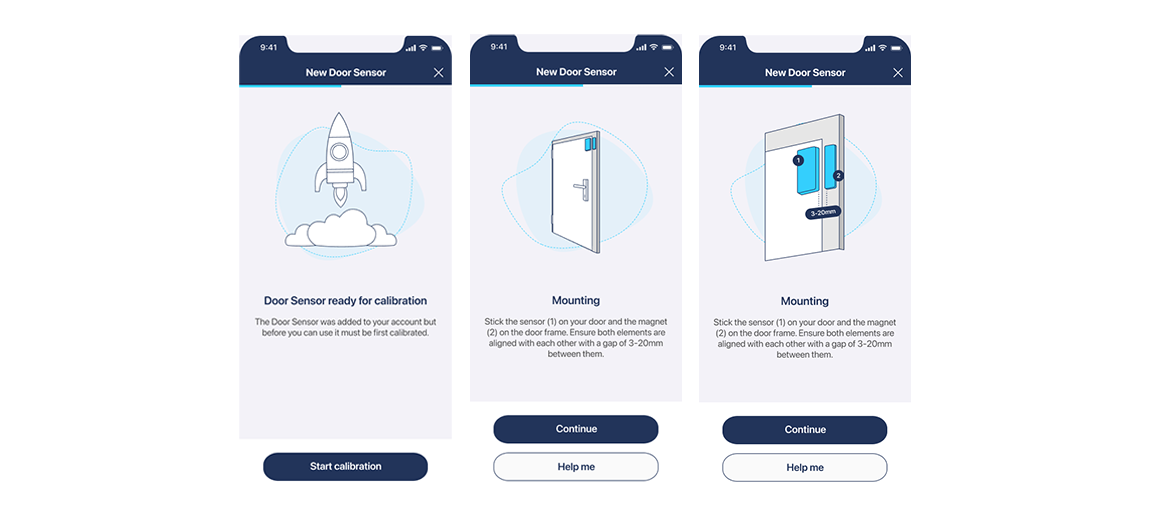
After verifying the activation code, the app proceeds to device calibration.
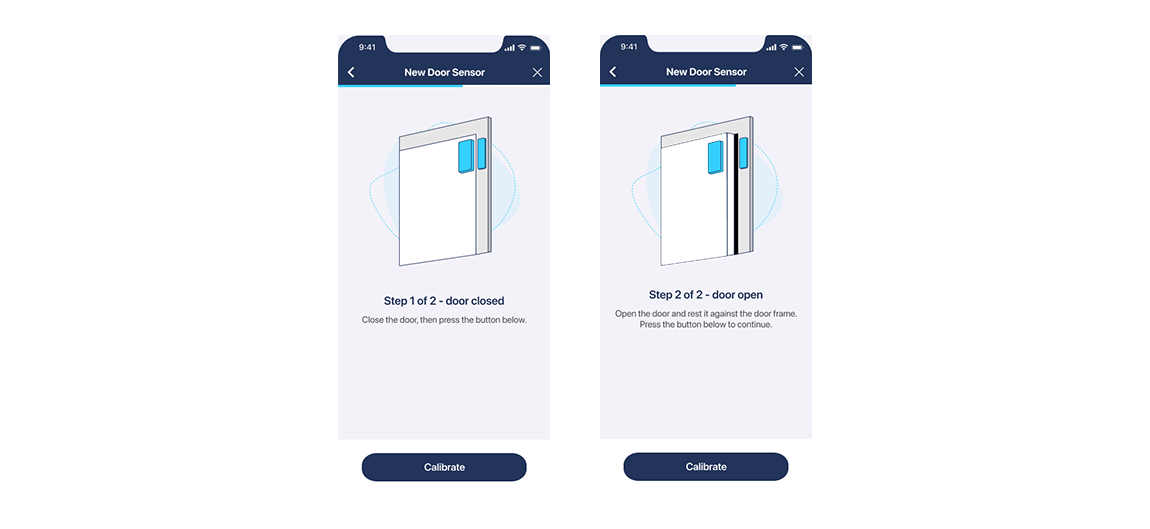
The calibration process sets the default position of the sensor and magnet units for the closed door position.
Start calibration and confirm correct device placement on your door according to previous guidelines. Press Continue.
Make sure the door leaf is fully closed, then press Calibrate.
Open the door slightly, with the door leaf gently resting against the door frame, then press Calibrate again.
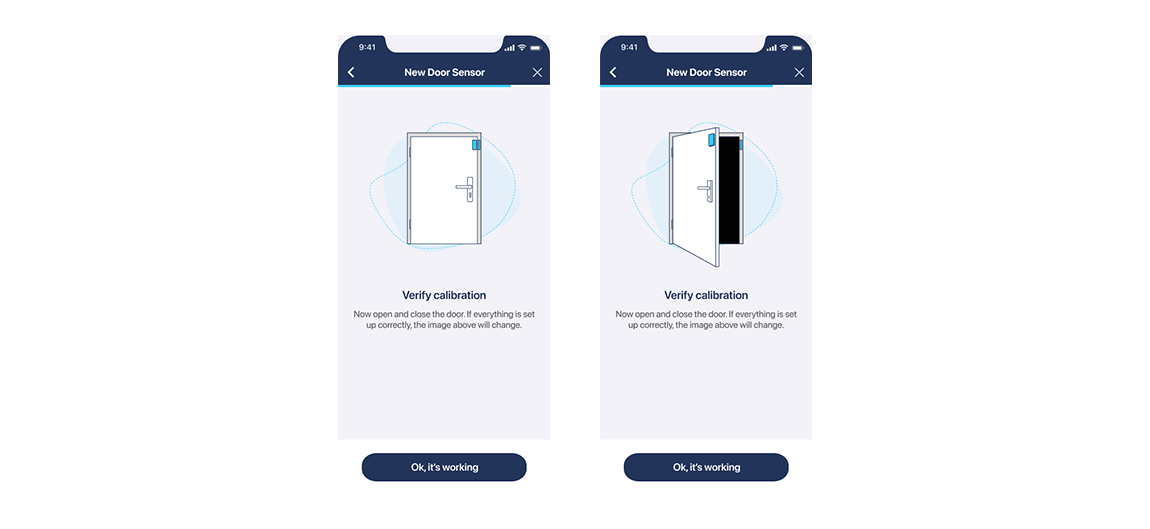
Verify that the device works correctly. Open and close the door, observing whether the app’s image changes accordingly. If all is fine, confirm with the button.
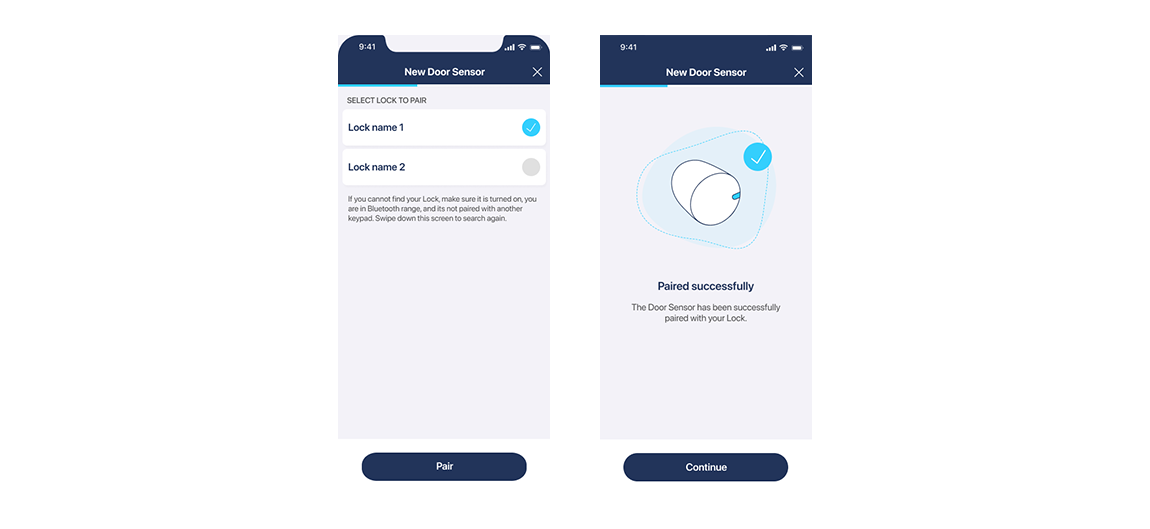
The Tedee Door Sensor now scans its Bluetooth range for Tedee smart locks. When presented with a list of smart locks, select the one you wish to pair with and press Continue to finish calibration.
Final installation
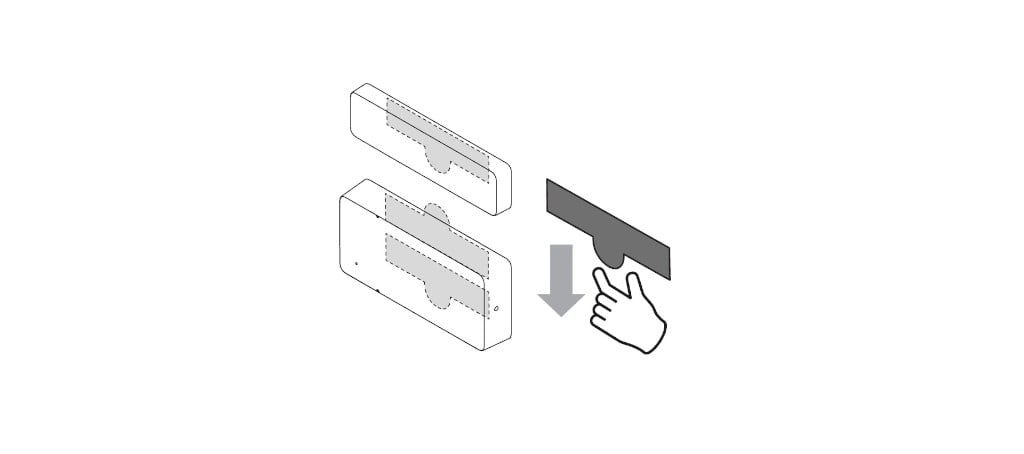
With the device installed on your door, paired with the app, and calibrated correctly, you may now remove the central fragments of the adhesive pads without detaching the units from the door. A larger contact surface provides better grip and steady adhesion, preventing device detachment or decalibration.
While gently holding the device in place, grip the adhesive pads’ overhanging tabs and pull parallel to the surface.
Features & Configuration
Using the Tedee Door Sensor with your smart lock provides additional information and enhances your security.
Note: When exploring settings and features of your smart lock paired with the Tedee Door Sensor, carefully read messages displayed on your screen.
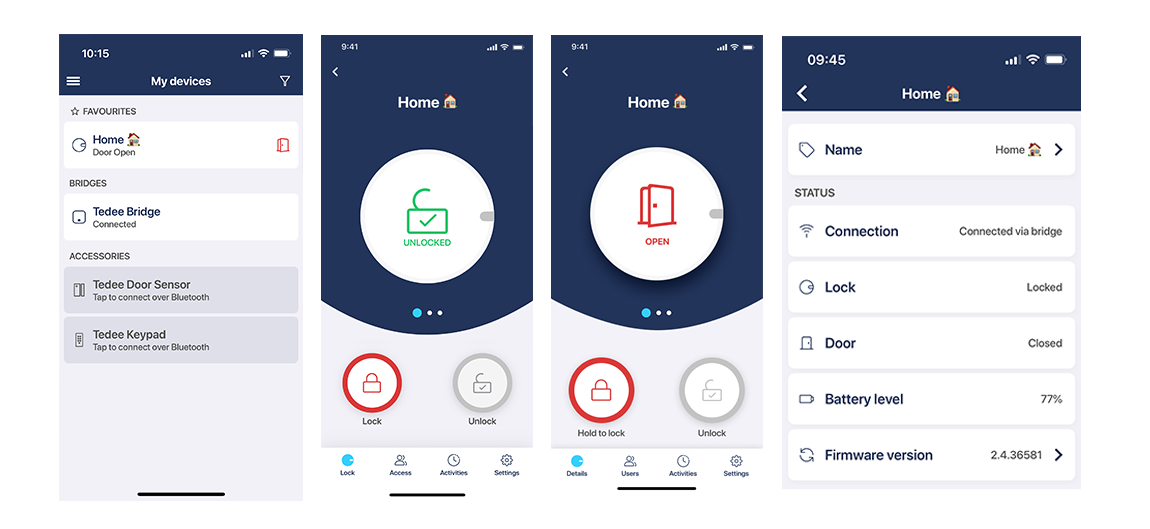
Lock locked/unlocked – App indicates whether your Tedee smart lock bolts are extended or retracted.
Door closed/open – App indicates whether your door is closed or open.
Door status
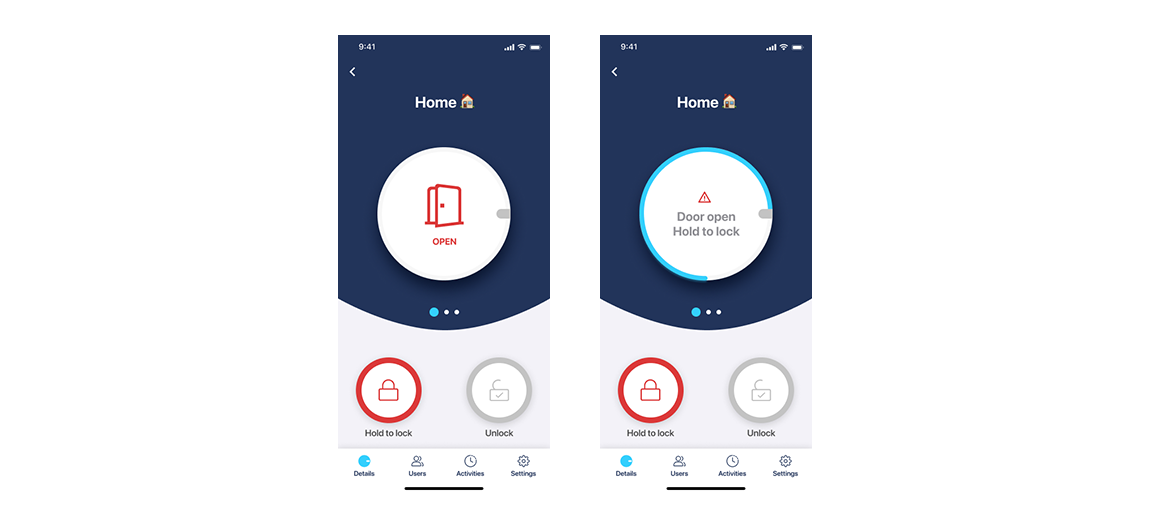
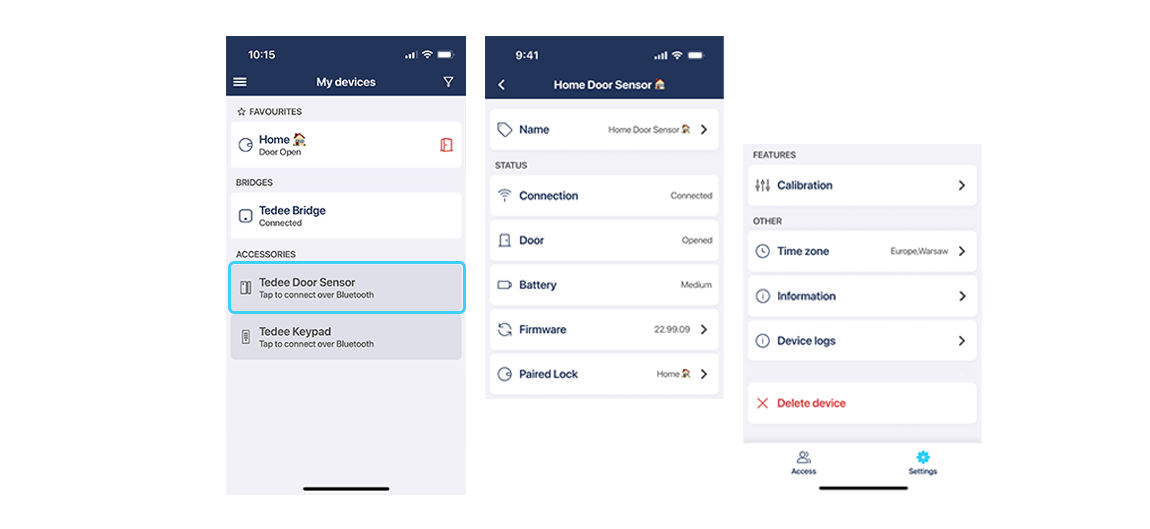
The Tedee Door Sensor indicates if your door is ajar by showing “door open” status on the My Devices list, smart lock status screen, and its settings screen.
Note: If the door is closed, whether locked or unlocked, the door status is not displayed but always available in the settings screen.
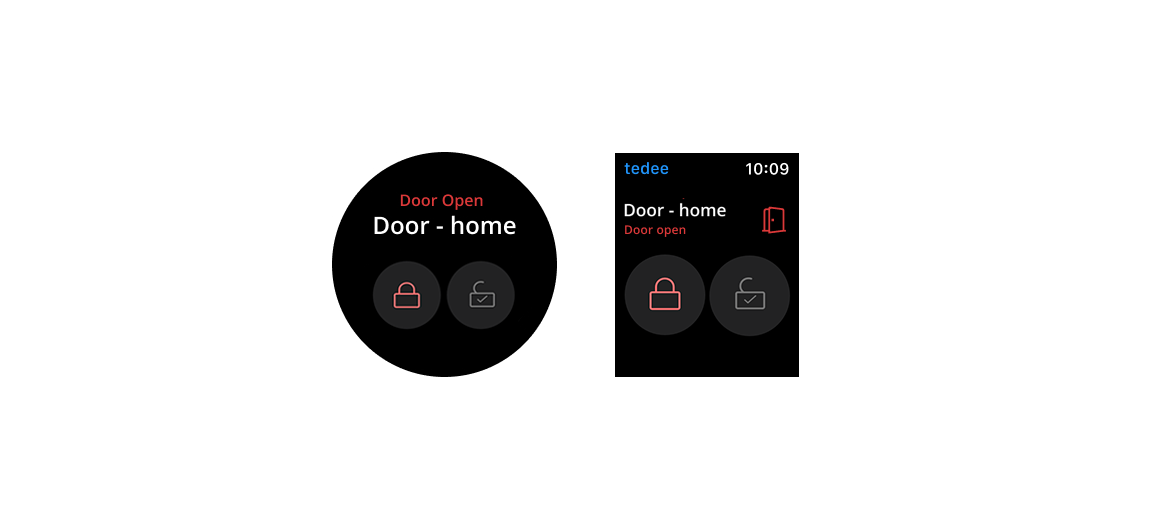
Door status is also instantly visible in smartwatch apps.
Locking automation
Tedee Door Sensor enhances the automatic locking feature with door position synchronisation.
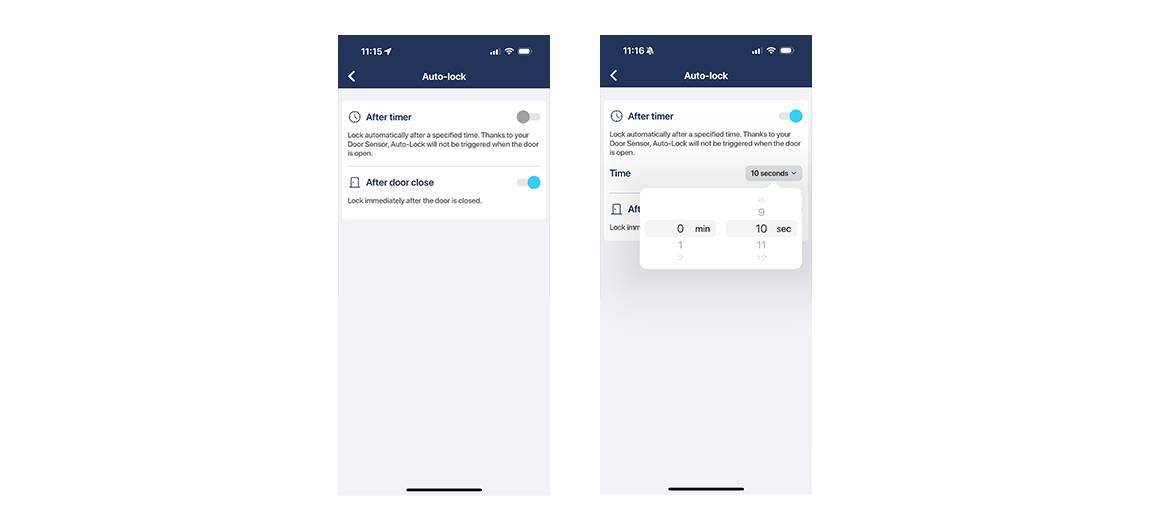
With the sensor, if you enable the “After door close” feature, the smart lock locks itself as soon as the door is closed. Enable automatic locking after closing the door in the smart lock’s settings.
If you simultaneously enable both automatic locking after closing the door and locking after a preset time:
- When the door is closed, it locks automatically right after closing.
- If the door is closed, unlocked, and not opened, it locks automatically after the timer expires.
Locking prevention
Tedee Door Sensor prevents the smart lock from locking – extending the door lock’s bolts – when the door is open. This prevents the door lock’s bolts from extending on an open door, which may cause decalibration and/or hitting the door frame.
Automatic locking
If your automatic locking is enabled after a timer, the smart lock will lock itself a preset time after the door is closed. Tedee Door Sensor prevents the lock from automatic locking when the door leaf is ajar.
Automatic locking is configured in your smart lock’s Settings.
App locking
When manually triggering a smart lock to lock itself on an open door leaf, the Tedee app requires the user to press and hold the locking button.
Security alerts
Note: Your smart lock must be paired with a Wi-Fi-connected Tedee Bridge to activate any Security Alerts.
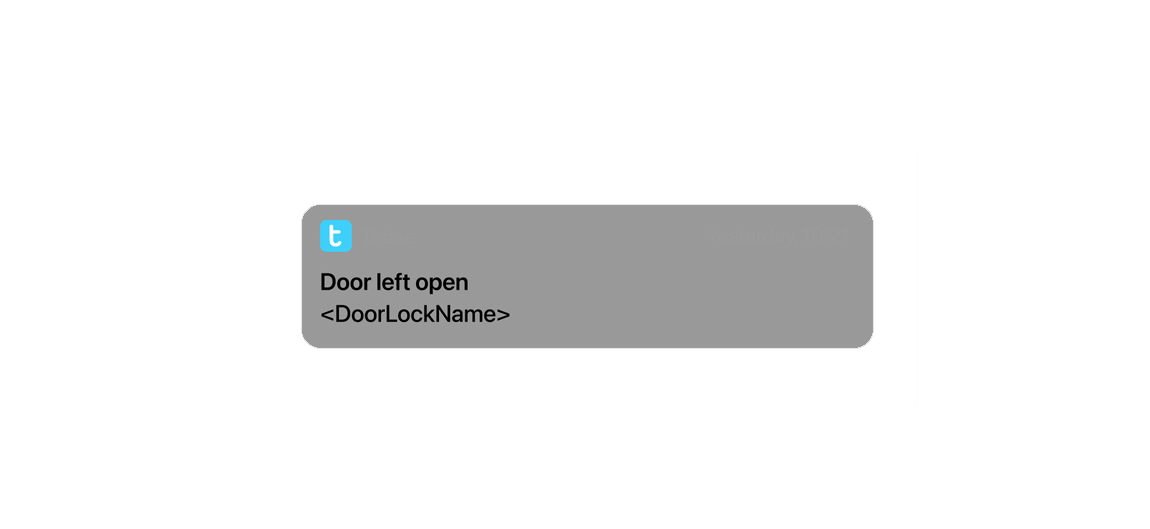
If the door is left open for an extended period, the Tedee Door Sensor allows the Tedee cloud system to send push notifications to your mobile device.
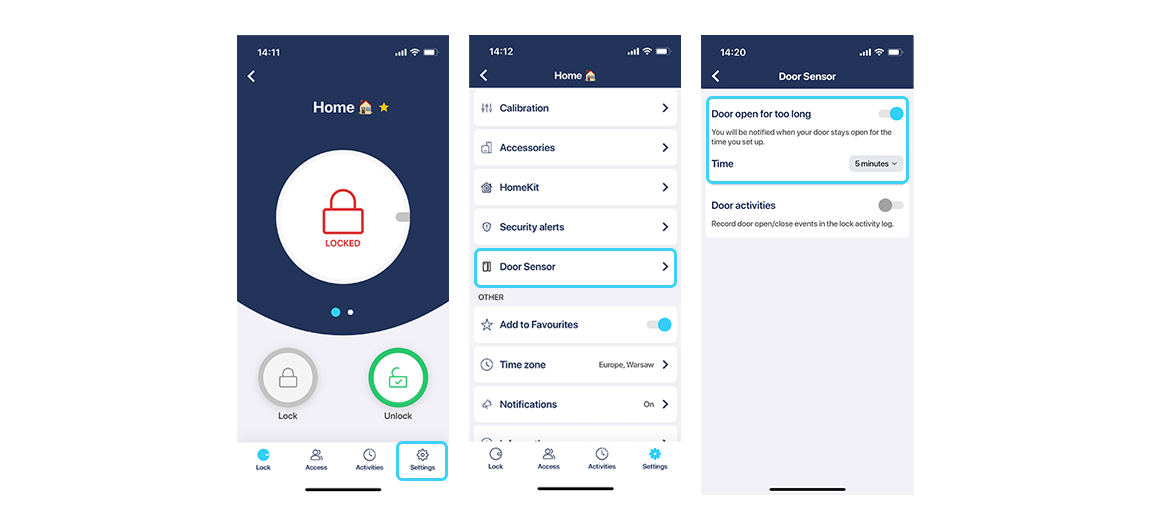
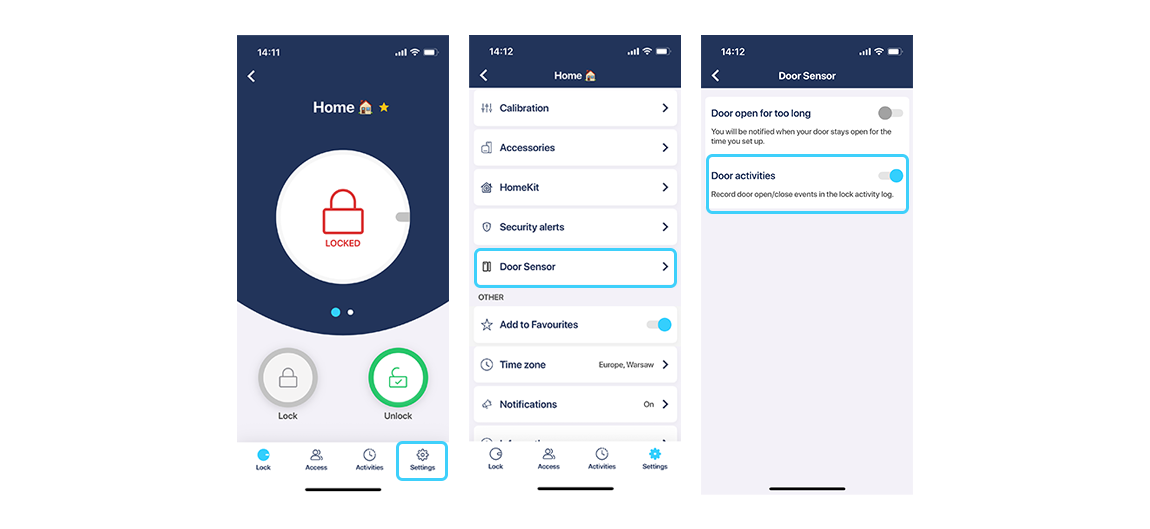
To activate this feature, go to your smart lock’s settings, scroll to the Door Sensor section, enable the first toggle to activate notifications, and select a time between 1 and 10 minutes. This will send notifications to your device if the door is left open longer than the preset time, regardless of locked/unlocked status.
Note: This is a separate function from the security alerts sent when your smart lock remains unlocked for an extended period. The “Lock left unlocked” feature requires automatic unlocking to be enabled and is triggered when you leave the designated range while the lock is still unlocked.
Activity logging
The Tedee Door Sensor can log door openings and closings, in addition to your smart lock’s locking/unlocking events. These activities are shown in the smart lock activity logs.
Note: Viewing live activity logs requires pairing the smart lock with a Tedee Bridge. Without the Tedee Bridge or an internet connection, openings and closings are logged by the smart lock and synchronized back with the Tedee app via Bluetooth when reconnected. Activity logs in this form are only displayed to Owner and Admin users.
To activate logging of door opening/closing events, enable this in the smart lock’s settings, under the Door Sensor section.
Activating this feature will most likely cause a lot of activities “door open/closed” being stored and displayed in your activity logs.
Maintenance
A properly installed Tedee Door Sensor typically operates maintenance-free for up to 2 years. However, certain actions may occasionally be necessary.
Settings
Most Tedee Door Sensor user features are configured through the smart lock’s settings screen. Selecting the Tedee Door Sensor from the My Devices list leads to individual device utilities.
The Tedee Door Sensor shows as “disconnected” from the user interface (displayed in grey) as it connects to a Tedee smart lock when necessary. To check the Door Sensor settings, tap the device name. Some settings can only be accessed and changed while the app is in Bluetooth range with the door sensor (like calibration, paring, or launching the device logs).
In the Tedee Door Sensor settings screen, you can:
- Change the device name within your Tedee ecosystem
- Check the connection status
- Check the door status
- Check battery levels
- Check and manually update firmware versions
- Check the paired smart lock, unpair the Door Sensor, or pair it with another smart lock
- Launch a recalibration process
- Set the operating time zone
- Access device information: Device ID, serial number, and security certificate expiration date
- Enable and share device logs
- Delete the device from your Tedee account
User management
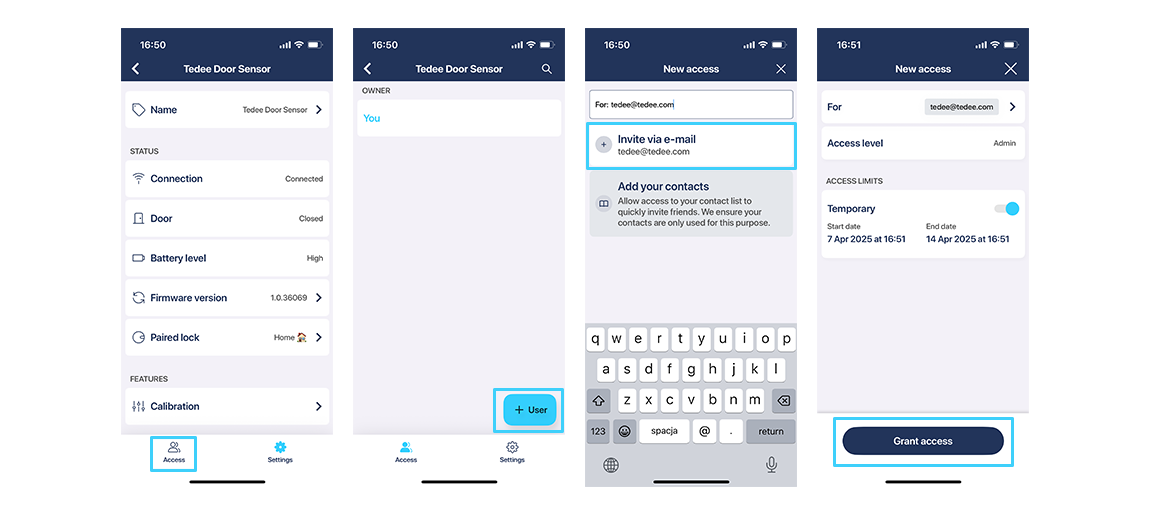
The user activating the Tedee Door Sensor becomes its Owner, gaining access to all device features and configurations, including pairing/unpairing it with a smart lock.
Owners can share Tedee Door Sensor control with an Administrator, who can configure notifications and activity logging.
Owners and Administrators can access Tedee Door Sensor settings, including battery level, firmware updates, advanced settings, and service logs. They can also see the door openings/closings in the smart lock’s activity logs, if enabled.
Note: Tedee Door Sensor does not include a User role.
All user levels – Owner, Administrator(s), and User(s) – of a smart lock paired with a Tedee Door Sensor may benefit from its features, even without being granted administration over the Tedee Door Sensor.
All persons using a smart lock paired with a Tedee Door Sensor:
- See the current door status, via Bluetooth or remotely, if the lock is paired with the bridge.
- Receive notifications of a door being left open for too long, if available and enabled.
Battery replacement
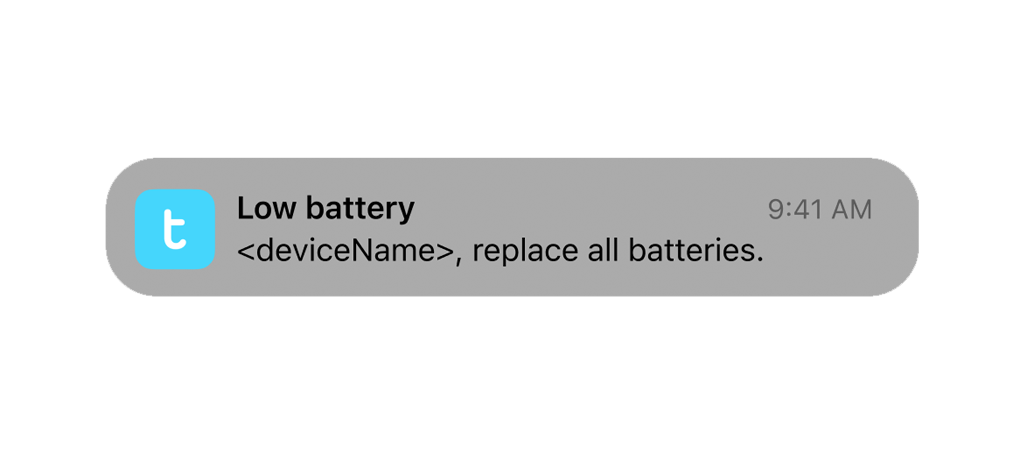
The Tedee Door Sensor operates for up to 2 years on a single CR2032 battery. When the battery level drops to 15%, the battery level will be indicated in the “My devices” list. If enabled, the device Owner/Admin will receive a notification on their mobile device.
Only 3V CR2032 batteries are allowed. There is a risk of permanent damage to the device and warranty loss if batteries with an operating voltage exceeding 3.3V are installed!
If installed correctly (without blocking battery access), the battery can be replaced without removing the battery cover from the door leaf/door frame.
WarningINGESTION HAZARD: This product contains a button cell or coin battery. DEATH or serious injury can occur if ingested. A swallowed button cell or coin battery can cause Internal Chemical Burns in as little as 2 hours. KEEP new and used batteries OUT OF REACH OF CHILDREN. Seek immediate medical attention if a battery is suspected to be swallowed or inserted inside any part of the body. |
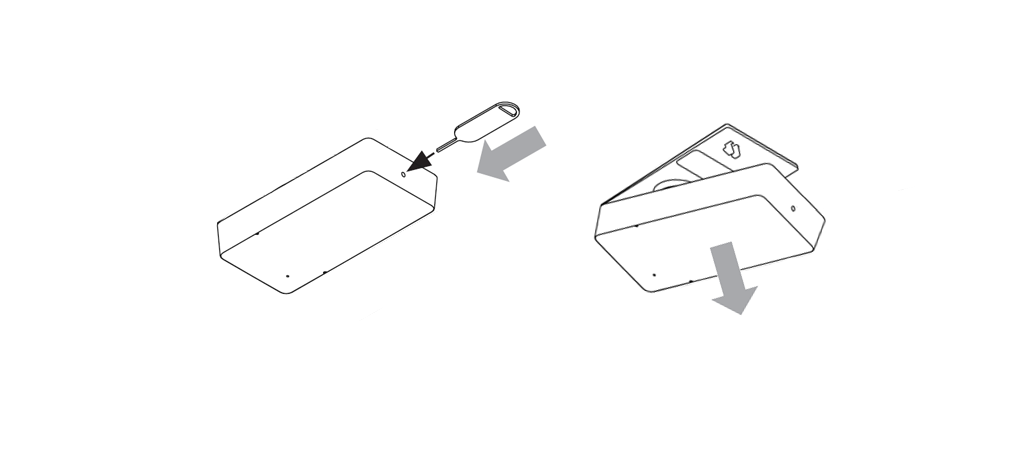
To replace the battery in your Tedee Door Sensor, insert the opening pin into the slot in the sensor unit of the Tedee Door Sensor and remove the device from the door frame/door leaf.
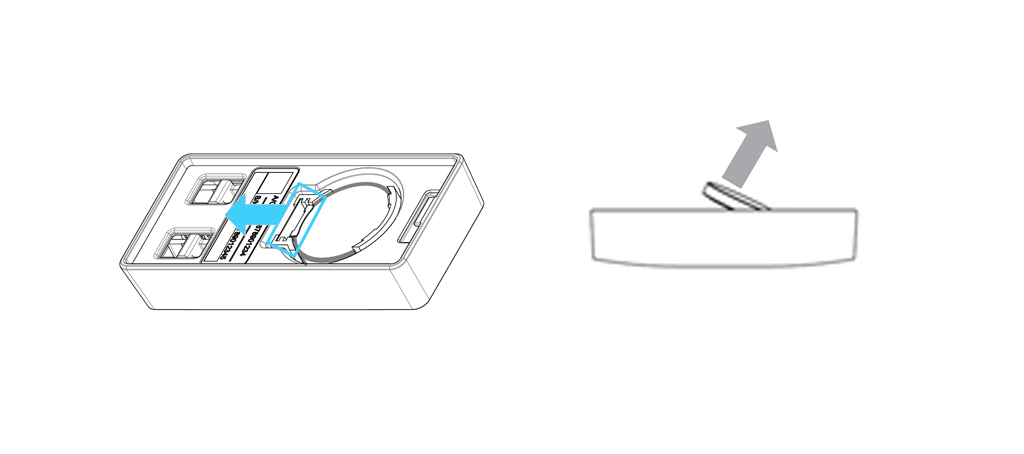
Slide the buckle on the edge of the battery and lift out the cell. Dispose of the used battery responsibly.
With the positive “+” pole facing upwards, insert the battery by placing its edge under the pin at the bottom of the device.
Press the opposite edge of the battery downwards until you hear a click, signifying a secure battery mount. The device turns on automatically.
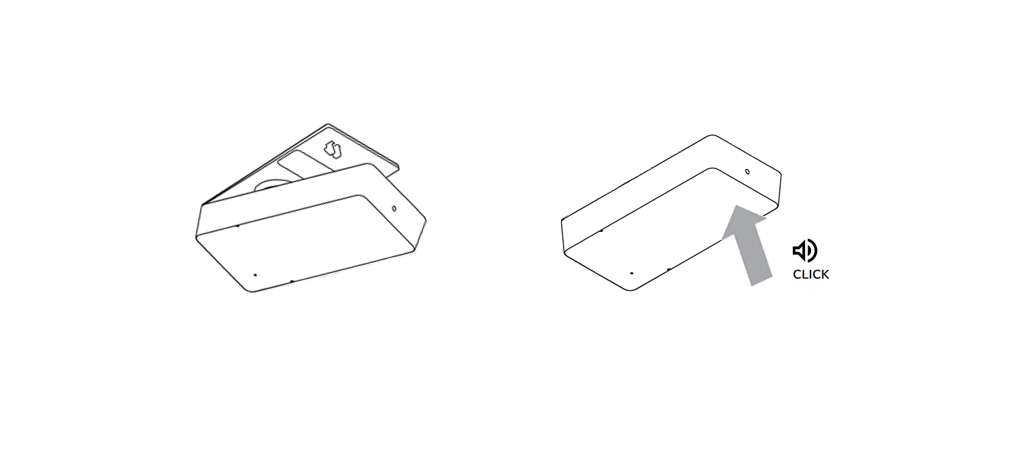
Hook the edge of the sensor onto the battery cover plate and press the sensor onto the battery cover until it clicks, confirming a secure mount.
After replacing the battery, ensure the device indicates its status properly and/or recalibrate if needed.
Device deinstallation
To remove the device from the door, start by detaching the sensor unit from its mounting cover using the battery cover opening pin.
Next, warm up the adhesive pad with a hairdryer for a couple of minutes. Then, gently lift the pad using a flat, blunt tool, and slowly separate it from the surface.
Repeat the process for the other unit.
Note: Beware of scratching the door frame or door leaf surface when using sharp objects. Always warm up the adhesive pad with a hairdryer before removal. If necessary, remove the adhesive residue with a cleaner suitable for your door type, testing its effect on your door finish first in a non-exposed area.
Factory reset
Underneath the face of the sensor module of the Tedee Door Sensor is a hidden reset button. You may use it to reset the device to the factory settings.
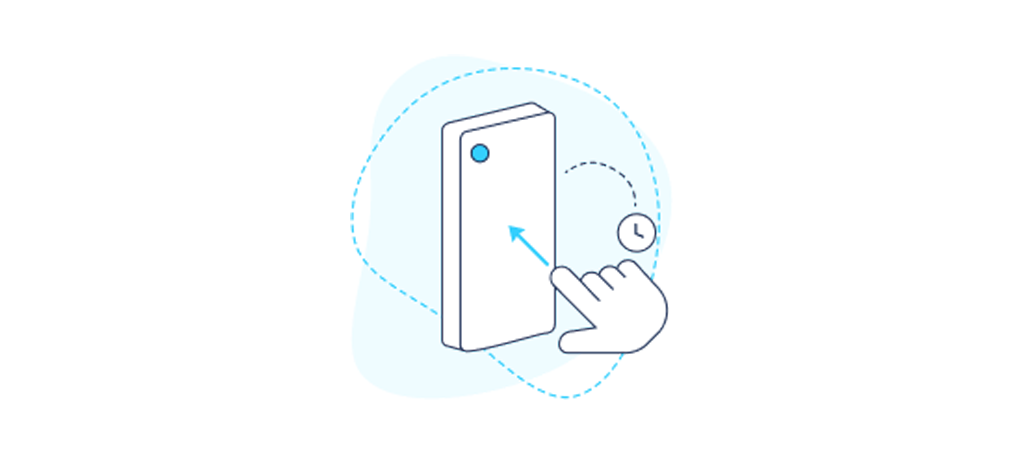
TTo reset the device to its factory settings, remove the battery from the device and insert it again. Within the first 10 seconds after inserting the battery, press and hold the button on the device until the red LED lights up (at least 10 seconds), then release the button.
Wait until the LED lights up again with three short blinks. This confirms the device has been reset to the factory settings.


